> ## Documentation Index
> Fetch the complete documentation index at: https://docs.yukoreviews.com/llms.txt
> Use this file to discover all available pages before exploring further.
# Installation and Setup
> Complete step-by-step guide to install Yuko and start collecting reviews on your WooCommerce store
## Before You Start
This guide helps you install Yuko on your WordPress + WooCommerce store and connect it to start collecting customer reviews.
**What you'll achieve:**
* Install and activate Yuko plugin on your WordPress site
* Connect your WooCommerce store to Yuko Dashboard
* Sync your products, orders and customers automatically
* Ready to send review requests and display reviews
**Total time needed:** 15-20 minutes **Technical level:** Beginner-friendly (no coding required)
***
## Requirements Checklist
Before starting, make sure you have:
**WordPress Requirements:**
* WordPress version 5.8 or higher
* WooCommerce plugin installed and active (version 6.0+)
* PHP version 7.4 or higher
* Admin access to your WordPress dashboard
**Check your versions:** Go to WordPress Admin → Dashboard (top right corner shows WordPress version) Go to WooCommerce → Status → System Status Report (shows WooCommerce and PHP versions)
**What you need ready:**
* Your business email address
* Store name and website URL
* Company information (name, address, phone)
* Access to your email inbox (for verification)
***
## Installation Steps
Follow these 5 steps to complete your Yuko installation:
First, create your Yuko account where you'll manage all review settings.
**How to create account:**
1. Visit [app.yukoapp.com](https://app.yukoapp.com/)
2. Enter your information:
* Full name
* Business email address (use your store's domain email if possible)
* Create a strong password
3. Click the **"Sign up"** button
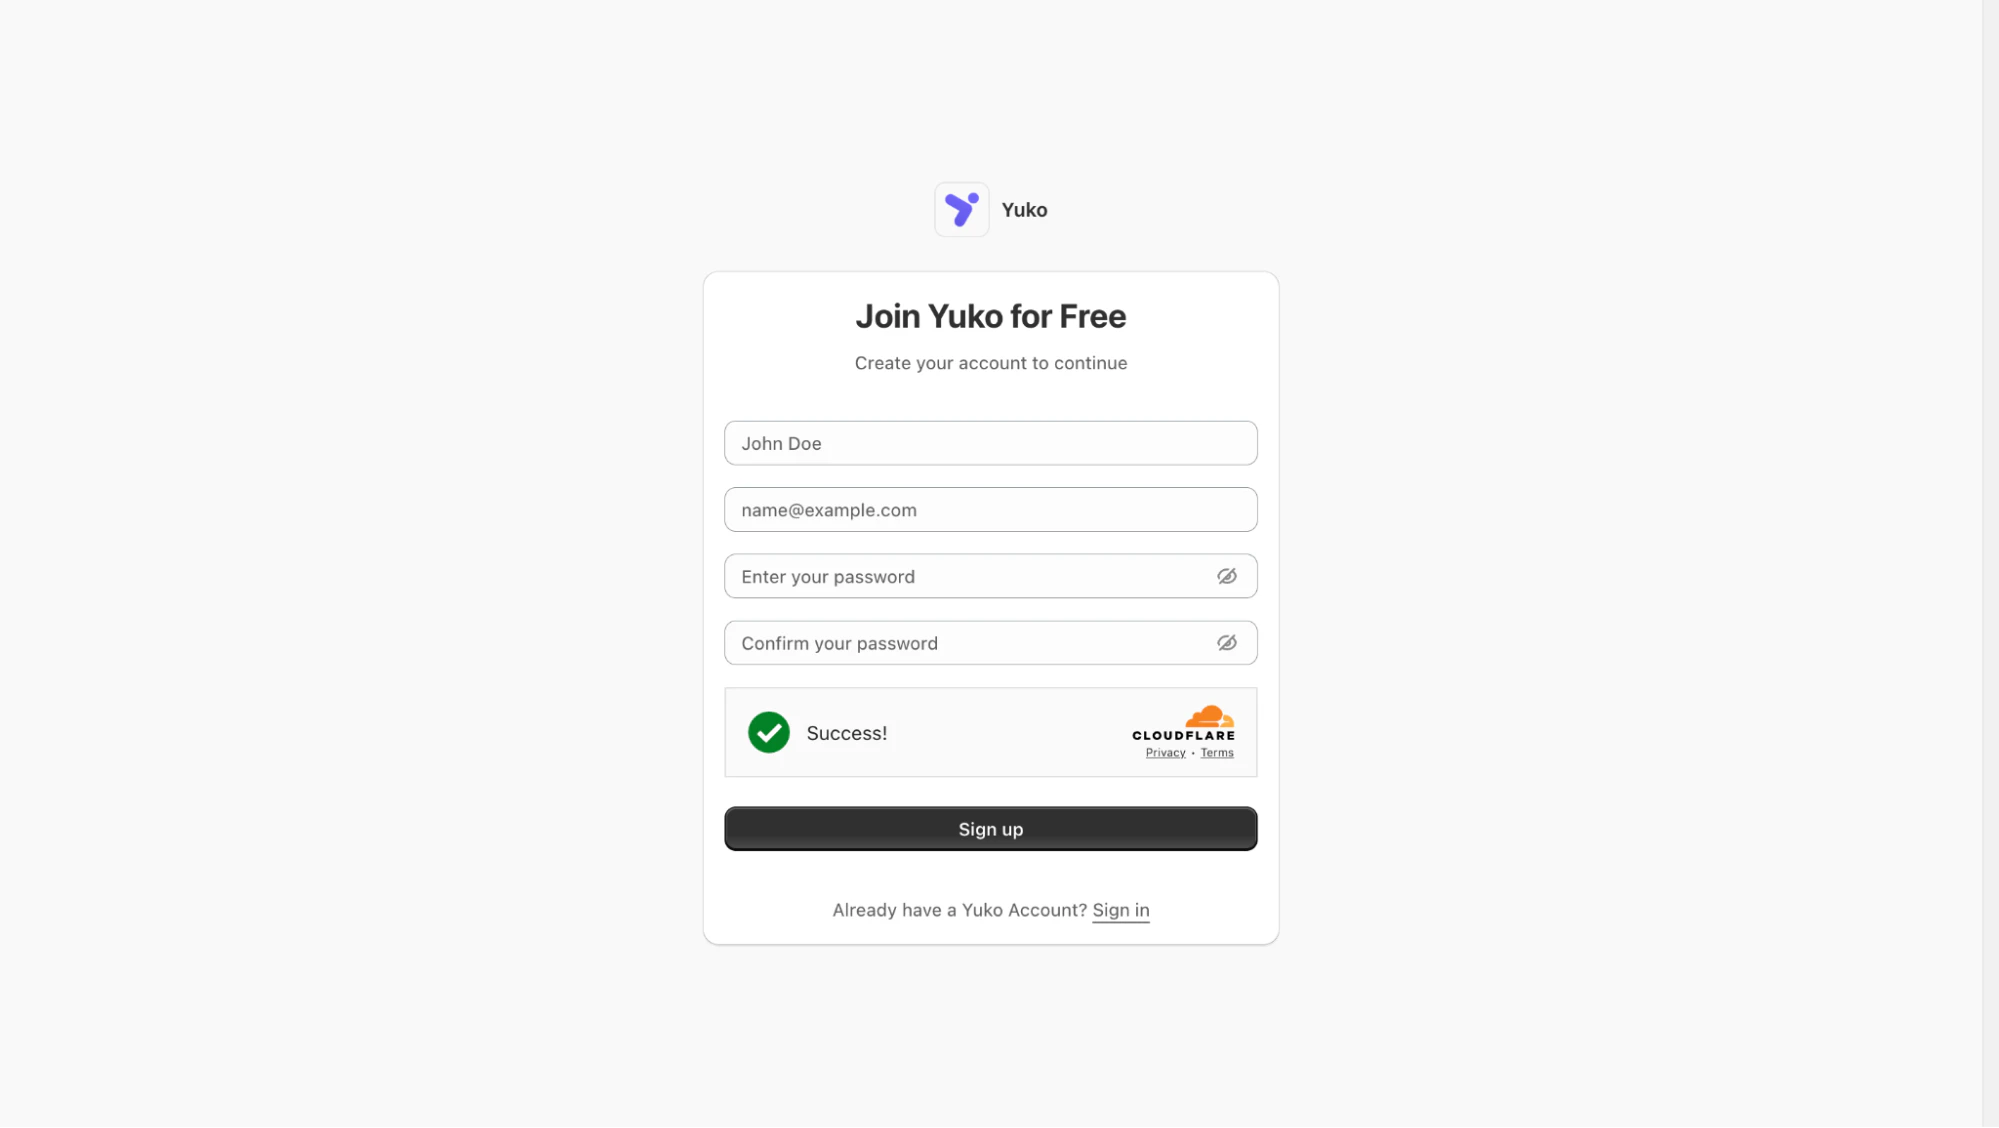 **What happens:** Yuko creates your workspace (Dashboard) where you'll manage reviews, emails, and settings.
**Time:** 2 minutes
**Important:** Use a business email, not a personal Gmail/Yahoo. Some features may require a verified business domain.
***
### Verify Your Email
* Check your inbox for the Yuko verification email
* Click the verification link to activate your account
* If not received, check spam or use **Resend verification email**
Once done, you will be redirected to the Yuko Dashboard to continue the next steps.
**What happens:** Yuko creates your workspace (Dashboard) where you'll manage reviews, emails, and settings.
**Time:** 2 minutes
**Important:** Use a business email, not a personal Gmail/Yahoo. Some features may require a verified business domain.
***
### Verify Your Email
* Check your inbox for the Yuko verification email
* Click the verification link to activate your account
* If not received, check spam or use **Resend verification email**
Once done, you will be redirected to the Yuko Dashboard to continue the next steps.
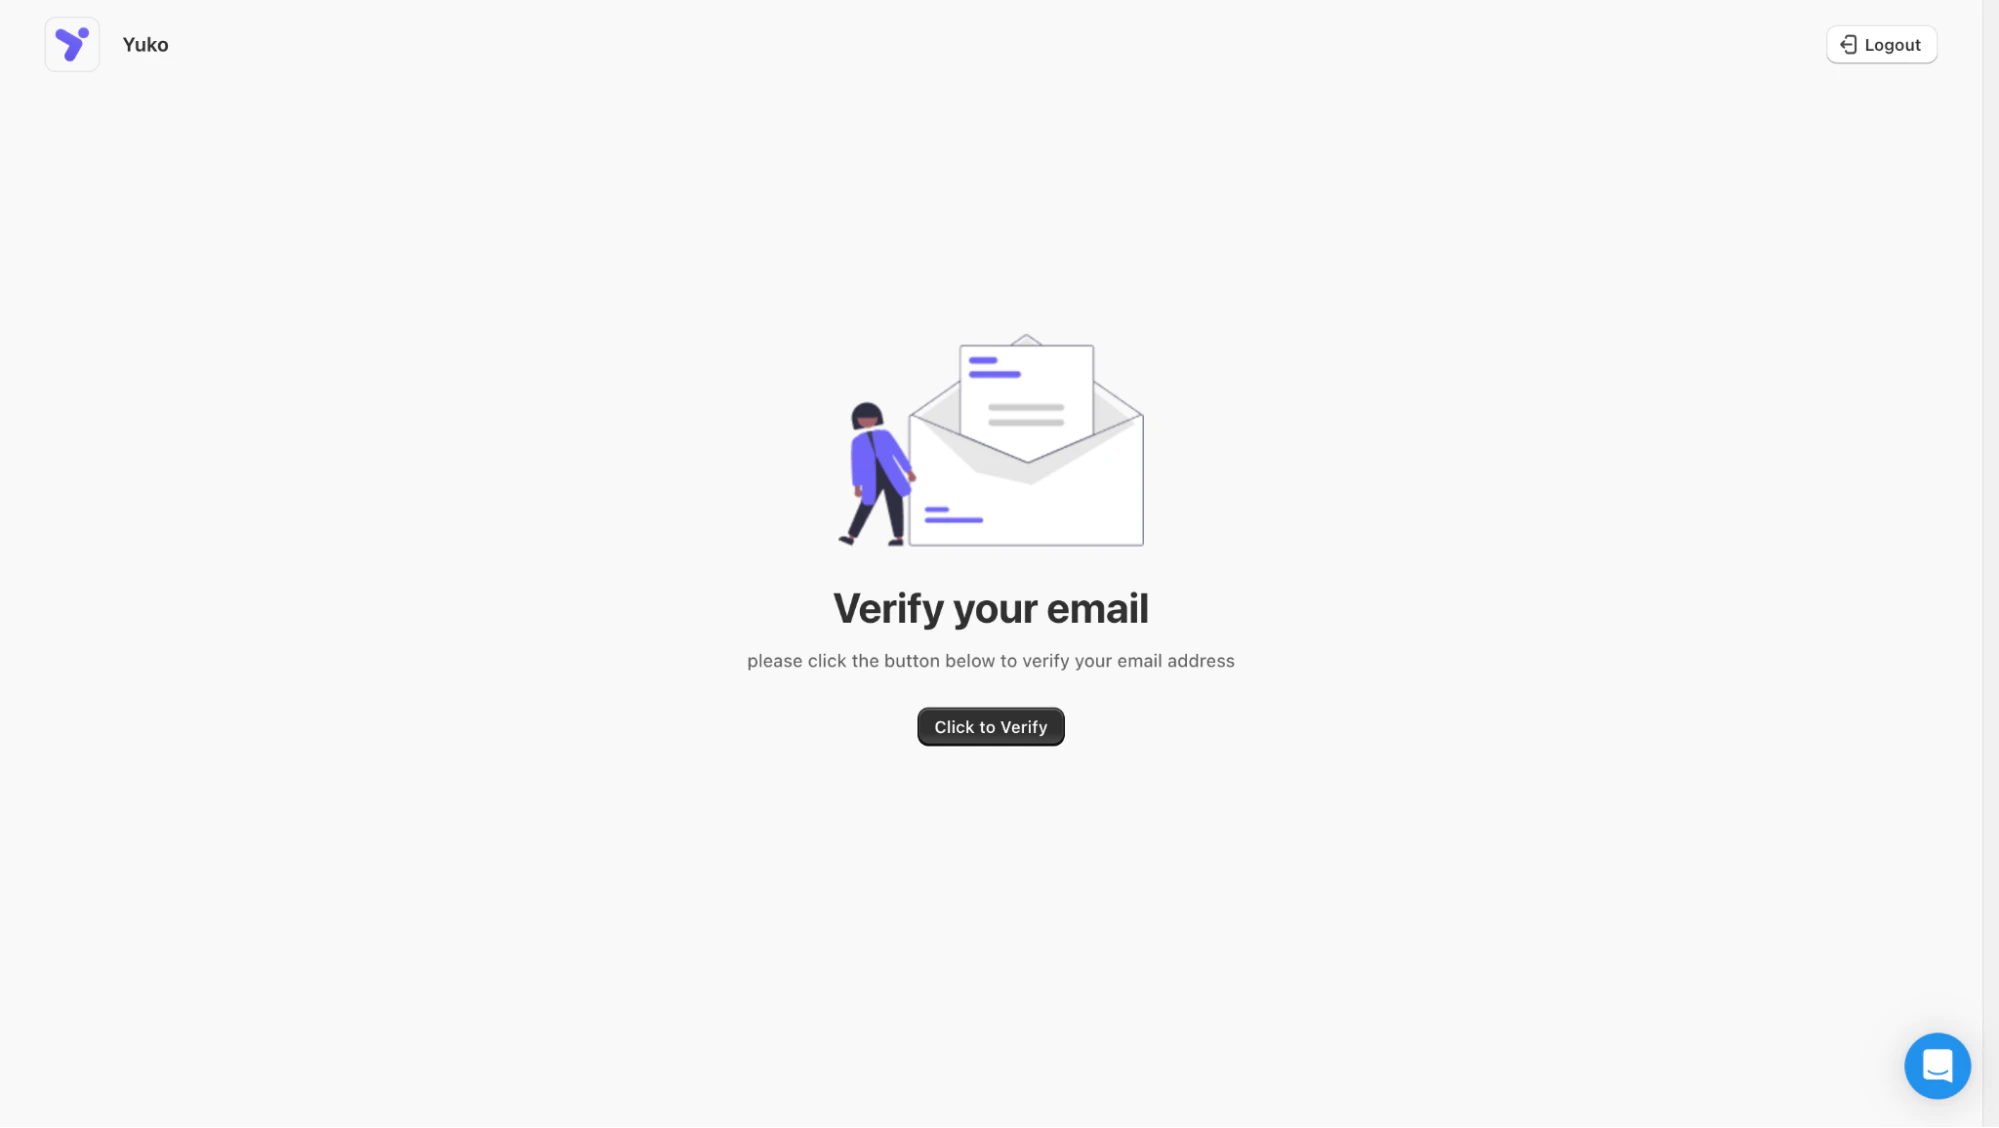 **Email not received?**
* Check your spam/junk folder
* Wait 2-3 minutes (sometimes delayed)
* Click "Resend verification email" on the Yuko page
* Make sure you entered the correct email address
Tell Yuko about your business. This information appears in review request emails and helps with compliance.
1. Fill in all required fields:
* **Business Name and Email Address** - Your store name (as customers know it) and the corresponding email address
* **Address** - Your business address
* **City, State, Country** - Location details
* **ZIP/Postal Code** - Your postal code
* **Phone Number** - Customer support phone number
* Click "**Update**".
**Email not received?**
* Check your spam/junk folder
* Wait 2-3 minutes (sometimes delayed)
* Click "Resend verification email" on the Yuko page
* Make sure you entered the correct email address
Tell Yuko about your business. This information appears in review request emails and helps with compliance.
1. Fill in all required fields:
* **Business Name and Email Address** - Your store name (as customers know it) and the corresponding email address
* **Address** - Your business address
* **City, State, Country** - Location details
* **ZIP/Postal Code** - Your postal code
* **Phone Number** - Customer support phone number
* Click "**Update**".
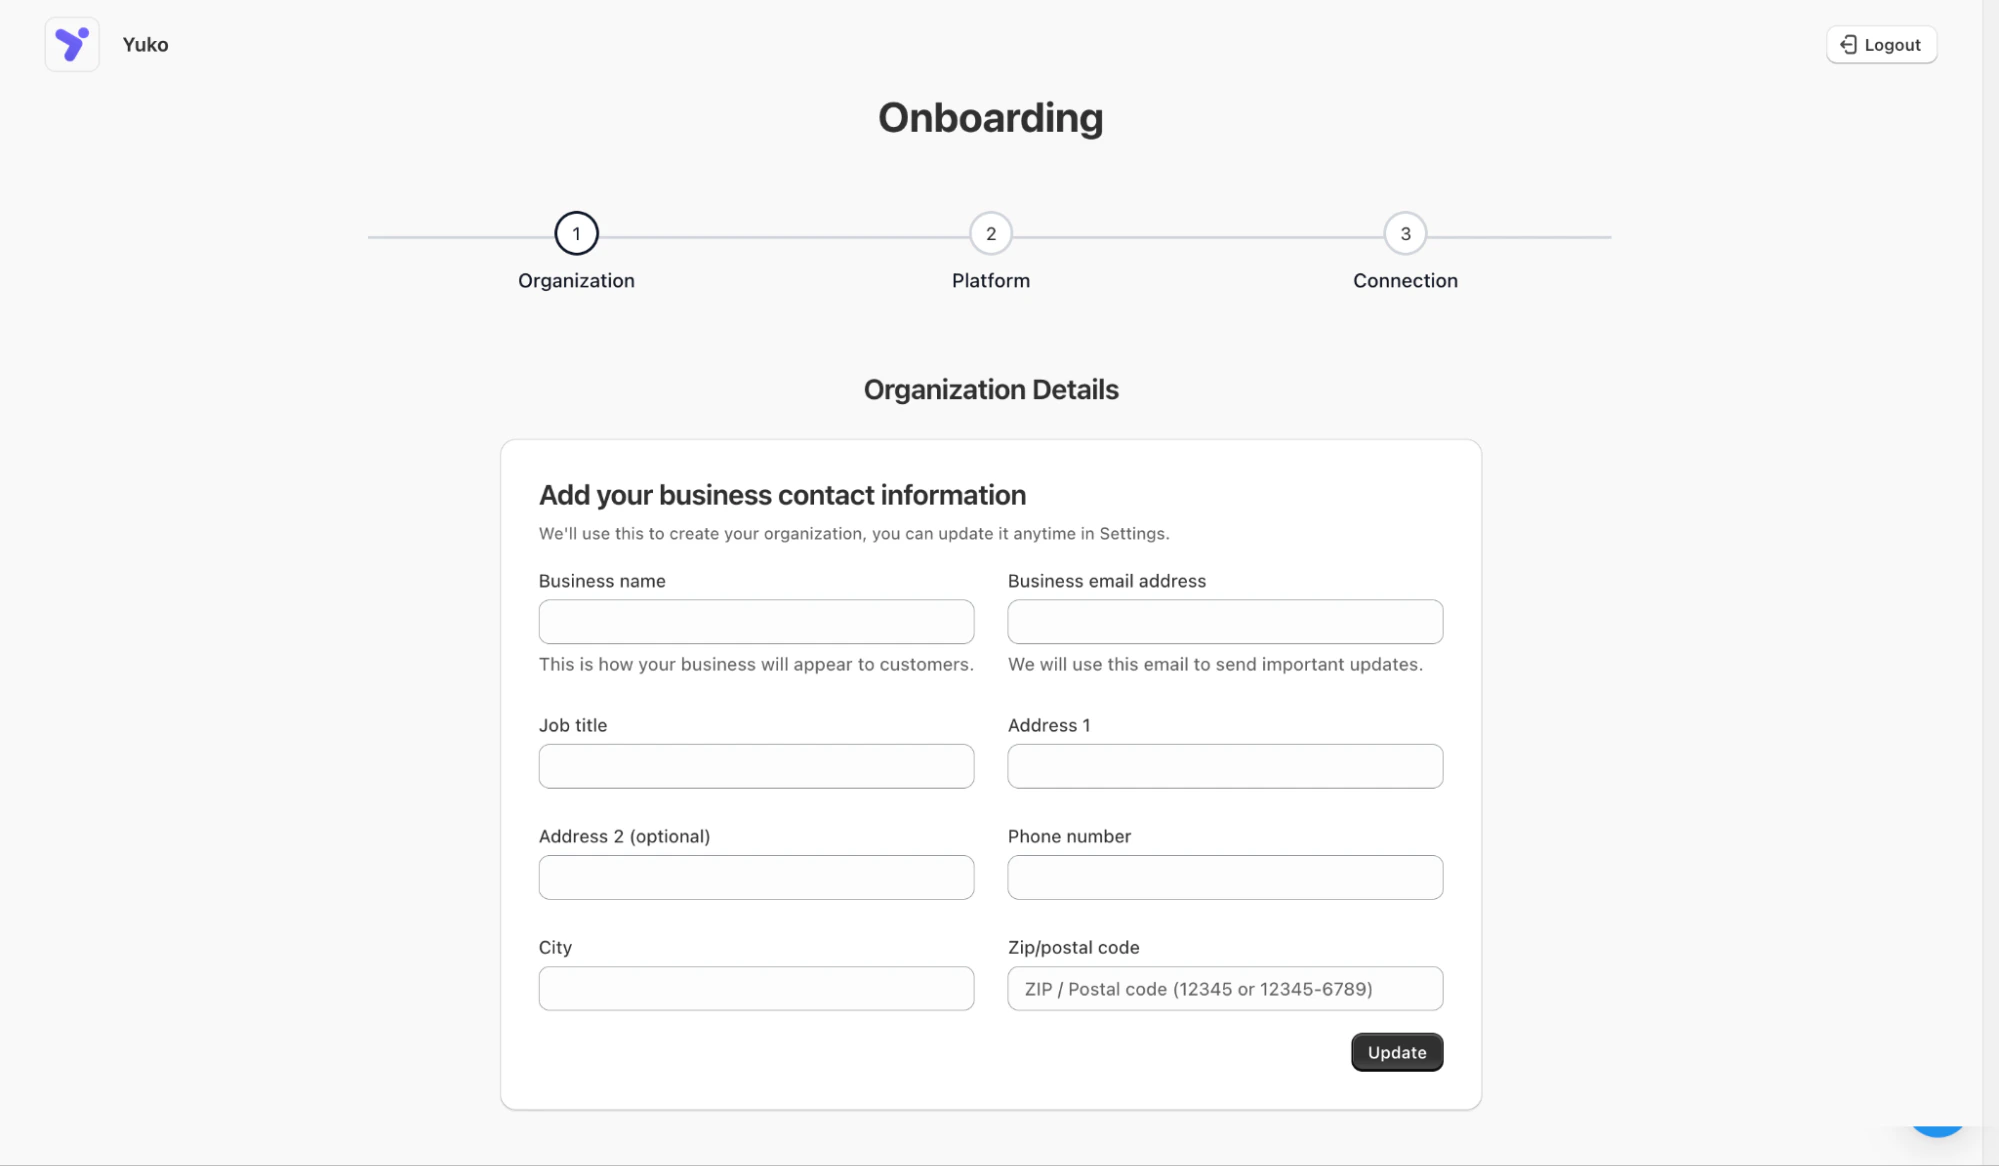 **Why this matters:** This information shows in your review request email footers (required by email regulations in many countries).
**Time:** 3 minutes
**Privacy note:** Your customers see this information in review emails. Use your public business address, not a personal home address.
Download the plugin file that connects your WordPress site to Yuko.
* Download the Yuko WooCommerce plugin when prompted
* Upload and activate it on your WordPress site
* Download the Yuko WooCommerce plugin when prompted by clicking on **"Download Plugin"**
* You will see a zip file downloaded
* Upload and activate it on your WordPress site
**Why this matters:** This information shows in your review request email footers (required by email regulations in many countries).
**Time:** 3 minutes
**Privacy note:** Your customers see this information in review emails. Use your public business address, not a personal home address.
Download the plugin file that connects your WordPress site to Yuko.
* Download the Yuko WooCommerce plugin when prompted
* Upload and activate it on your WordPress site
* Download the Yuko WooCommerce plugin when prompted by clicking on **"Download Plugin"**
* You will see a zip file downloaded
* Upload and activate it on your WordPress site
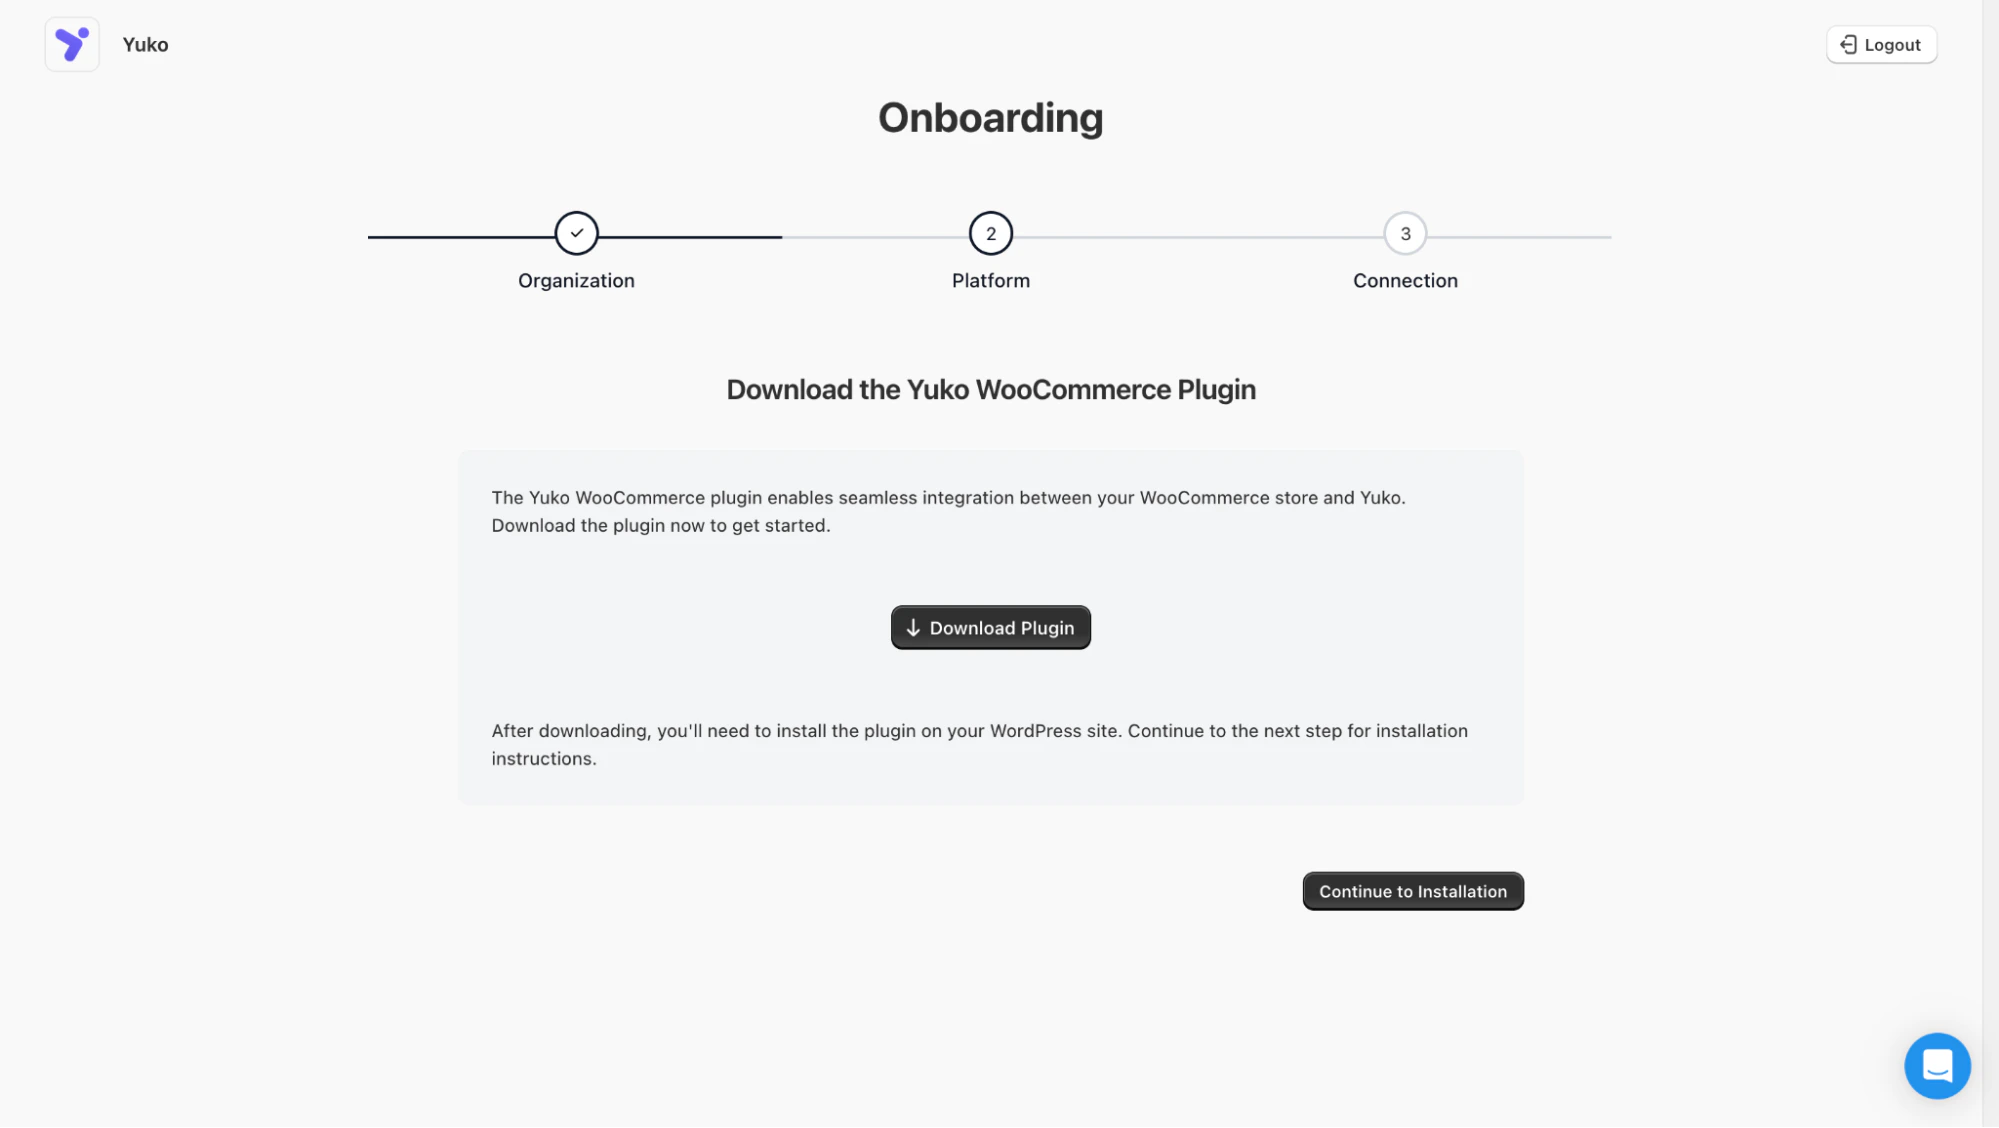 **What you downloaded:** A ZIP file (approximately 5 MB) containing the Yuko WordPress plugin.
**Time:** 1 minute
**File location:** Remember where you saved yuko.zip - you'll need it in the next step. Most browsers save to your Downloads folder.
Upload and activate the Yuko plugin in your WordPress admin panel.
**How to install:**
1. Open a new browser tab
2. Log in to your **WordPress Admin Panel** (usually: yoursite.com/wp-admin)
3. In the left sidebar, go to **Plugins → Add New**
4. Click the **Upload Plugin** button (at the top of the page)
5. Click **Choose File**
6. Select the `yuko.zip` file you downloaded
7. Click **Install Now**
8. Wait for the progress bar to complete (30-60 seconds)
9. Click **Activate Plugin**
**What you downloaded:** A ZIP file (approximately 5 MB) containing the Yuko WordPress plugin.
**Time:** 1 minute
**File location:** Remember where you saved yuko.zip - you'll need it in the next step. Most browsers save to your Downloads folder.
Upload and activate the Yuko plugin in your WordPress admin panel.
**How to install:**
1. Open a new browser tab
2. Log in to your **WordPress Admin Panel** (usually: yoursite.com/wp-admin)
3. In the left sidebar, go to **Plugins → Add New**
4. Click the **Upload Plugin** button (at the top of the page)
5. Click **Choose File**
6. Select the `yuko.zip` file you downloaded
7. Click **Install Now**
8. Wait for the progress bar to complete (30-60 seconds)
9. Click **Activate Plugin**
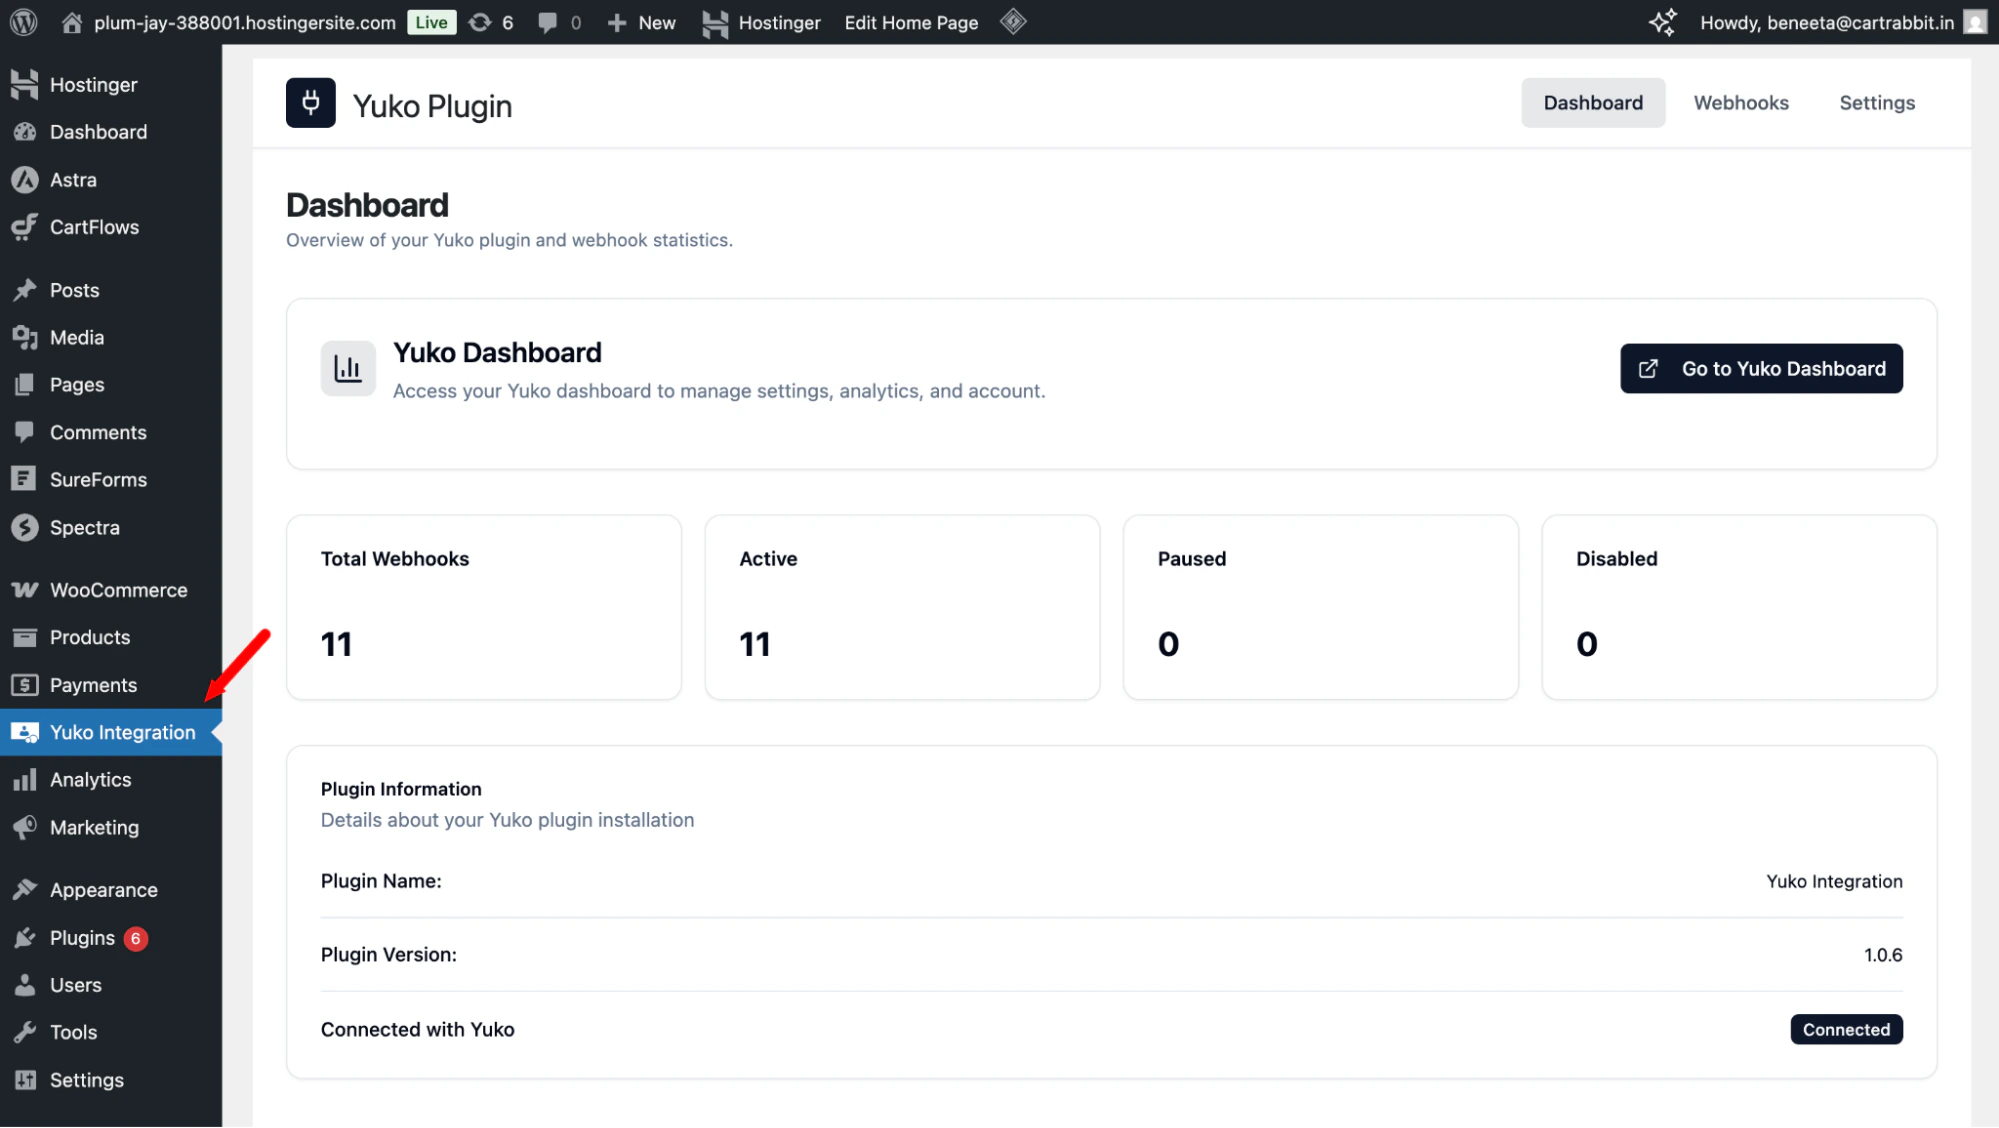 **Success indicator:** You'll see the "Plugin activated" message, and "Yuko Integration" appear in your WordPress sidebar.
**Time:** 3 minutes
Link your WooCommerce store with Yuko so they can communicate.
**How to connect:**\
\
Return to your **Yuko Onboarding** (you will be redirected to this page)
1. Return to your **Yuko Dashboard** (in the other browser tab)
2. In the **Store URL** field, enter your store's URL
* Example: `https://yourstore.com` or `https://shop.yourstore.com`
* Include `https://` but not `/wp-admin` or other paths
3. Click **Authenticate** to give Yuko permission
**Success indicator:** You'll see the "Plugin activated" message, and "Yuko Integration" appear in your WordPress sidebar.
**Time:** 3 minutes
Link your WooCommerce store with Yuko so they can communicate.
**How to connect:**\
\
Return to your **Yuko Onboarding** (you will be redirected to this page)
1. Return to your **Yuko Dashboard** (in the other browser tab)
2. In the **Store URL** field, enter your store's URL
* Example: `https://yourstore.com` or `https://shop.yourstore.com`
* Include `https://` but not `/wp-admin` or other paths
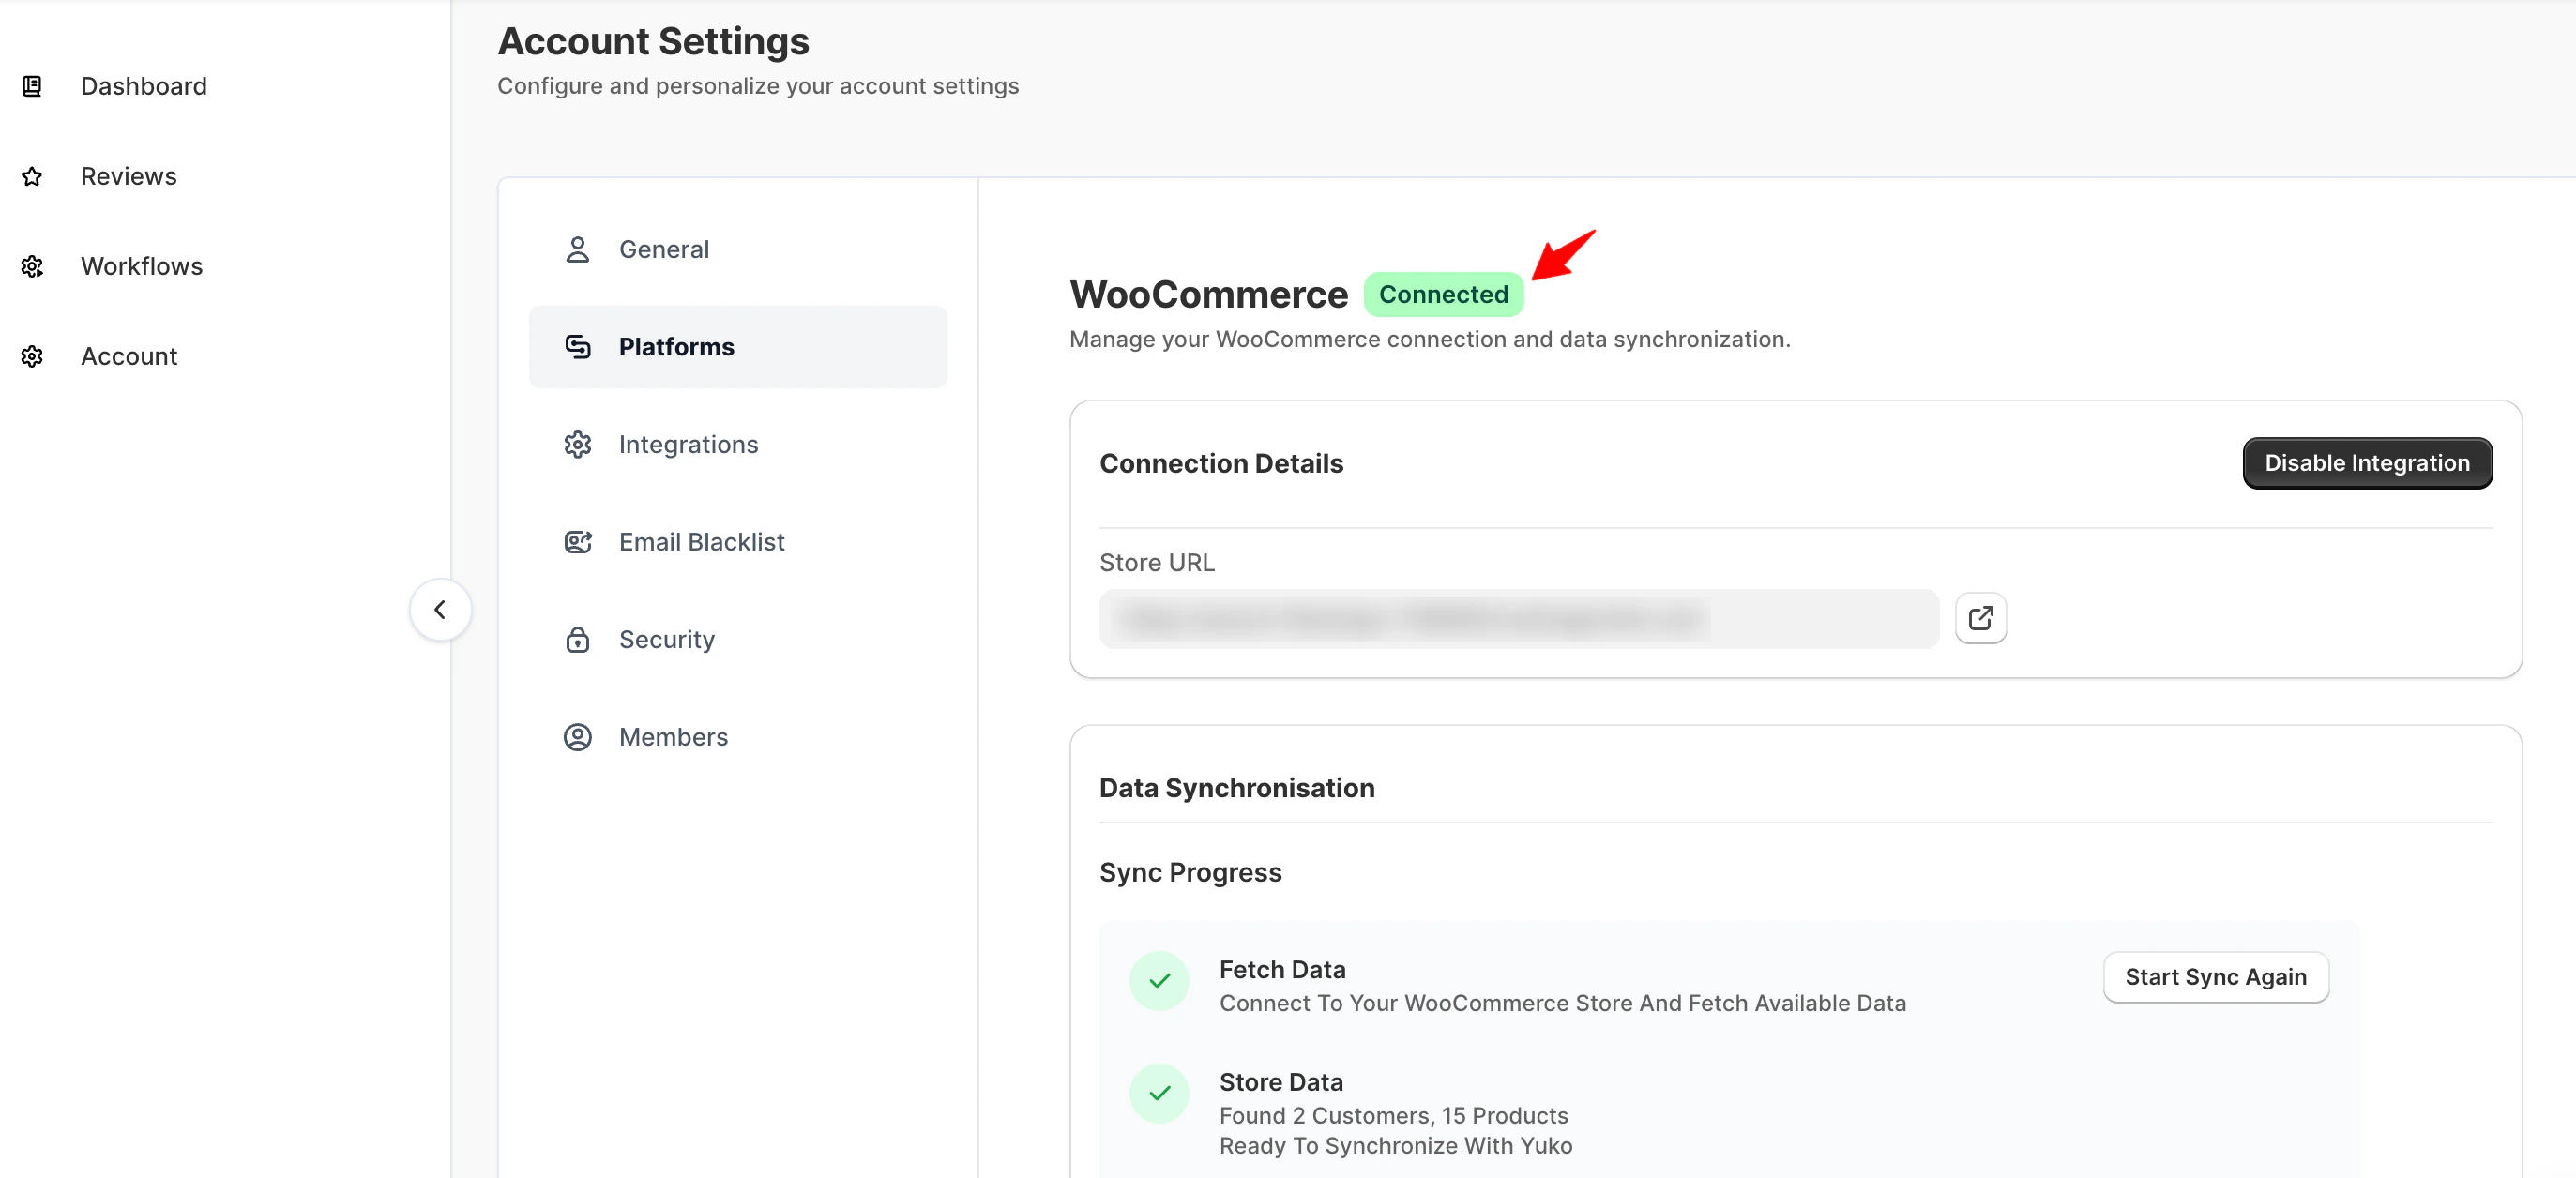
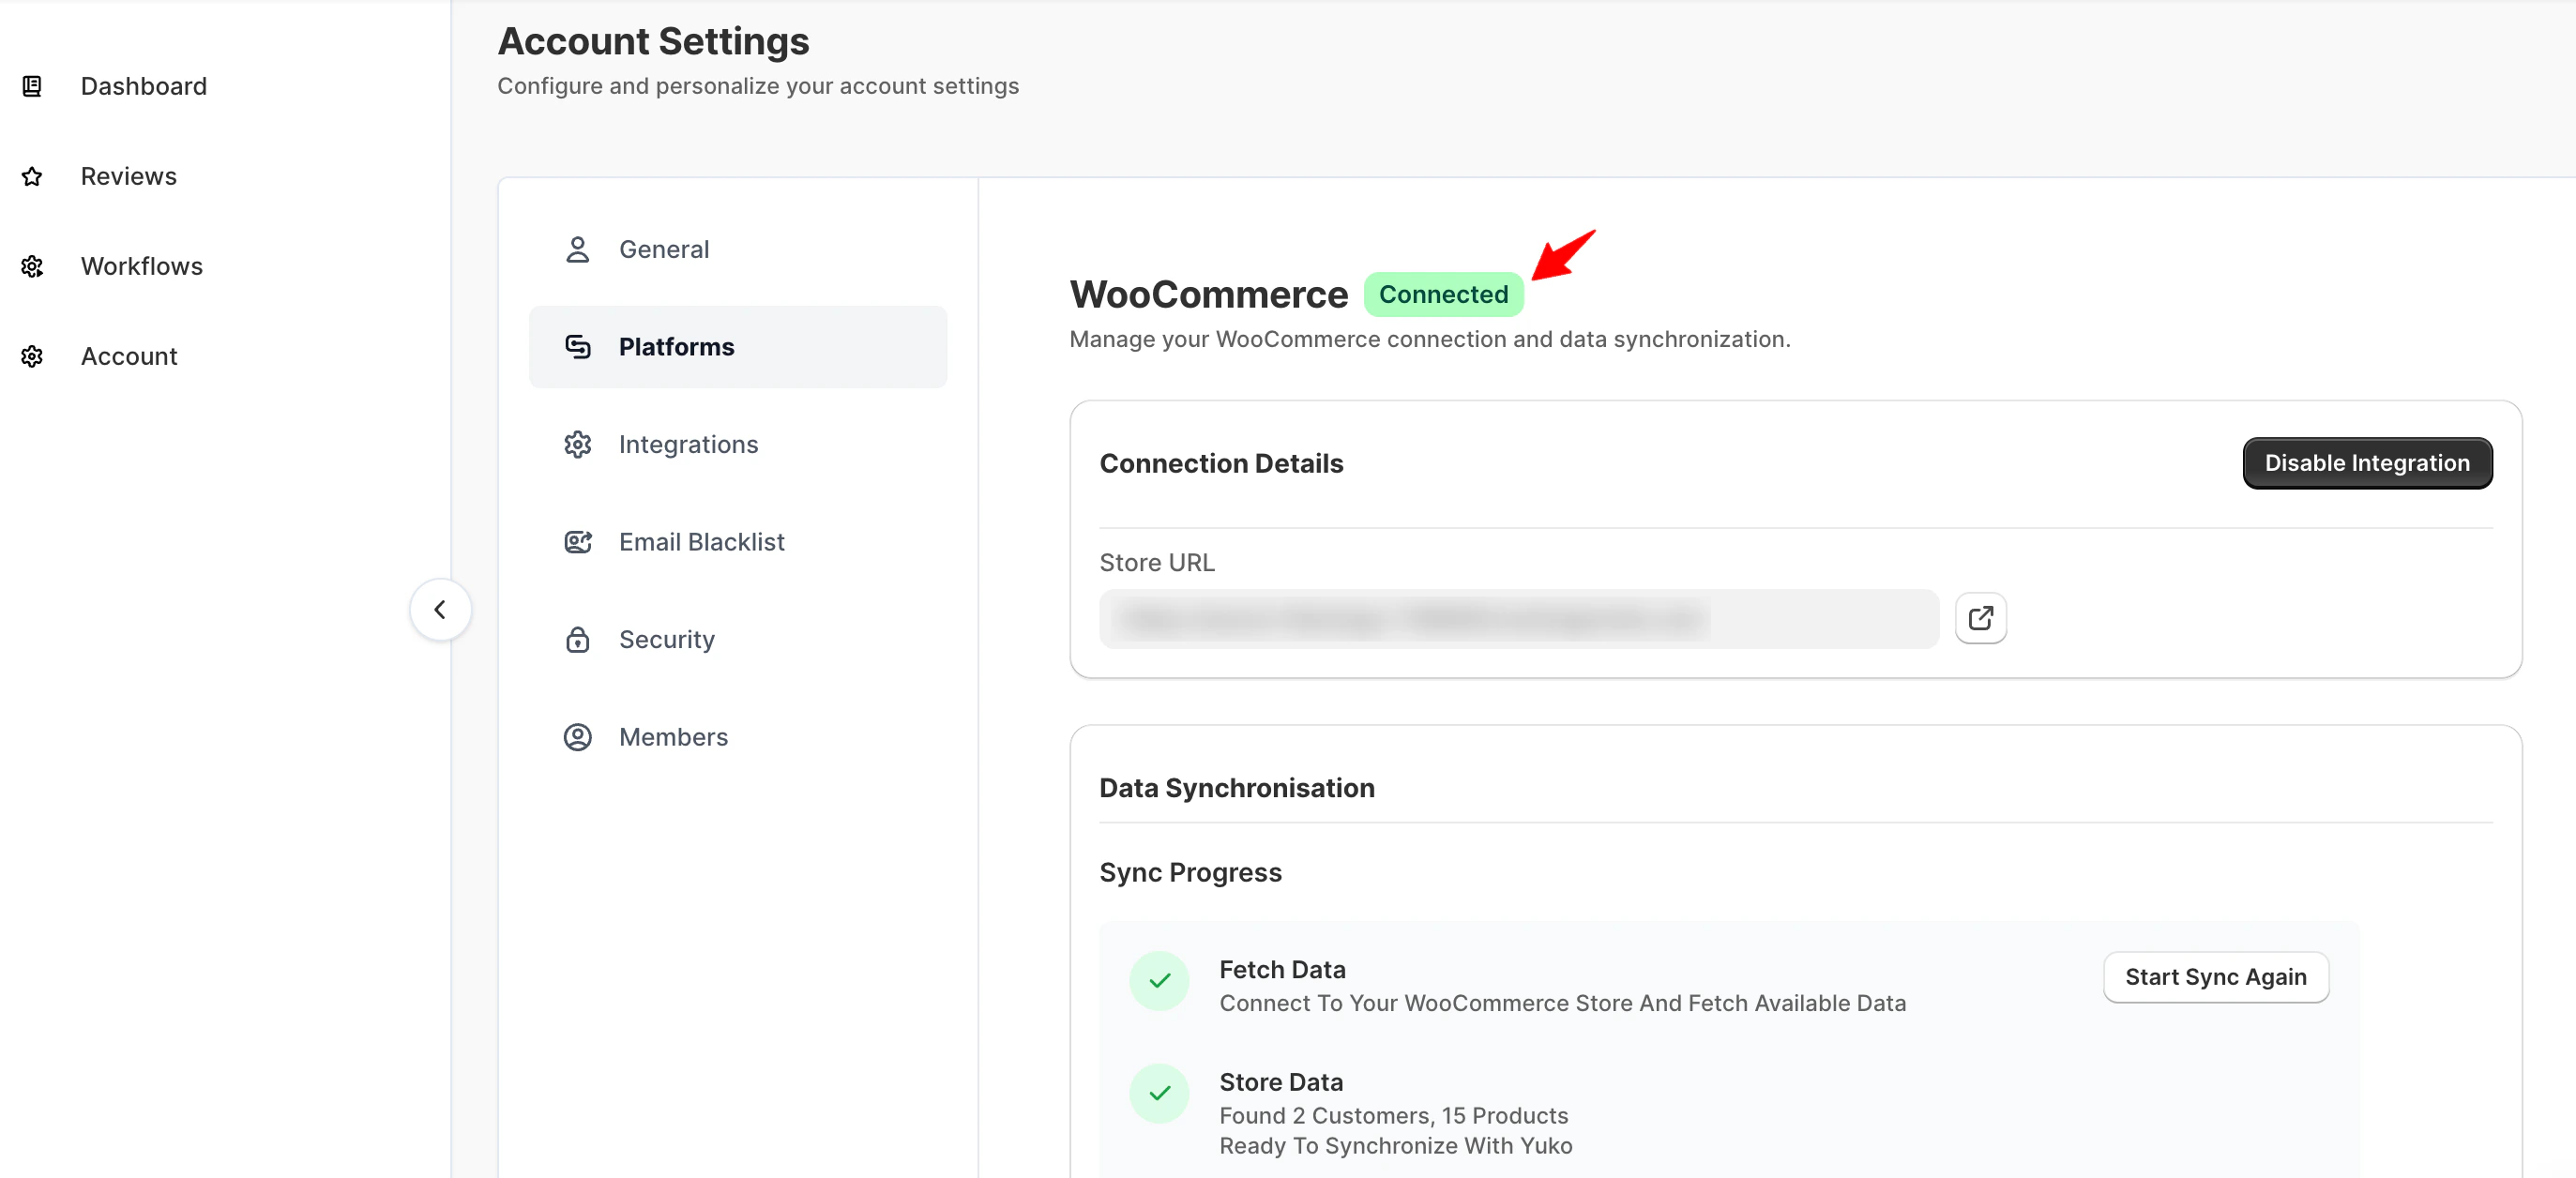
3. Click **Authenticate** to give Yuko permission 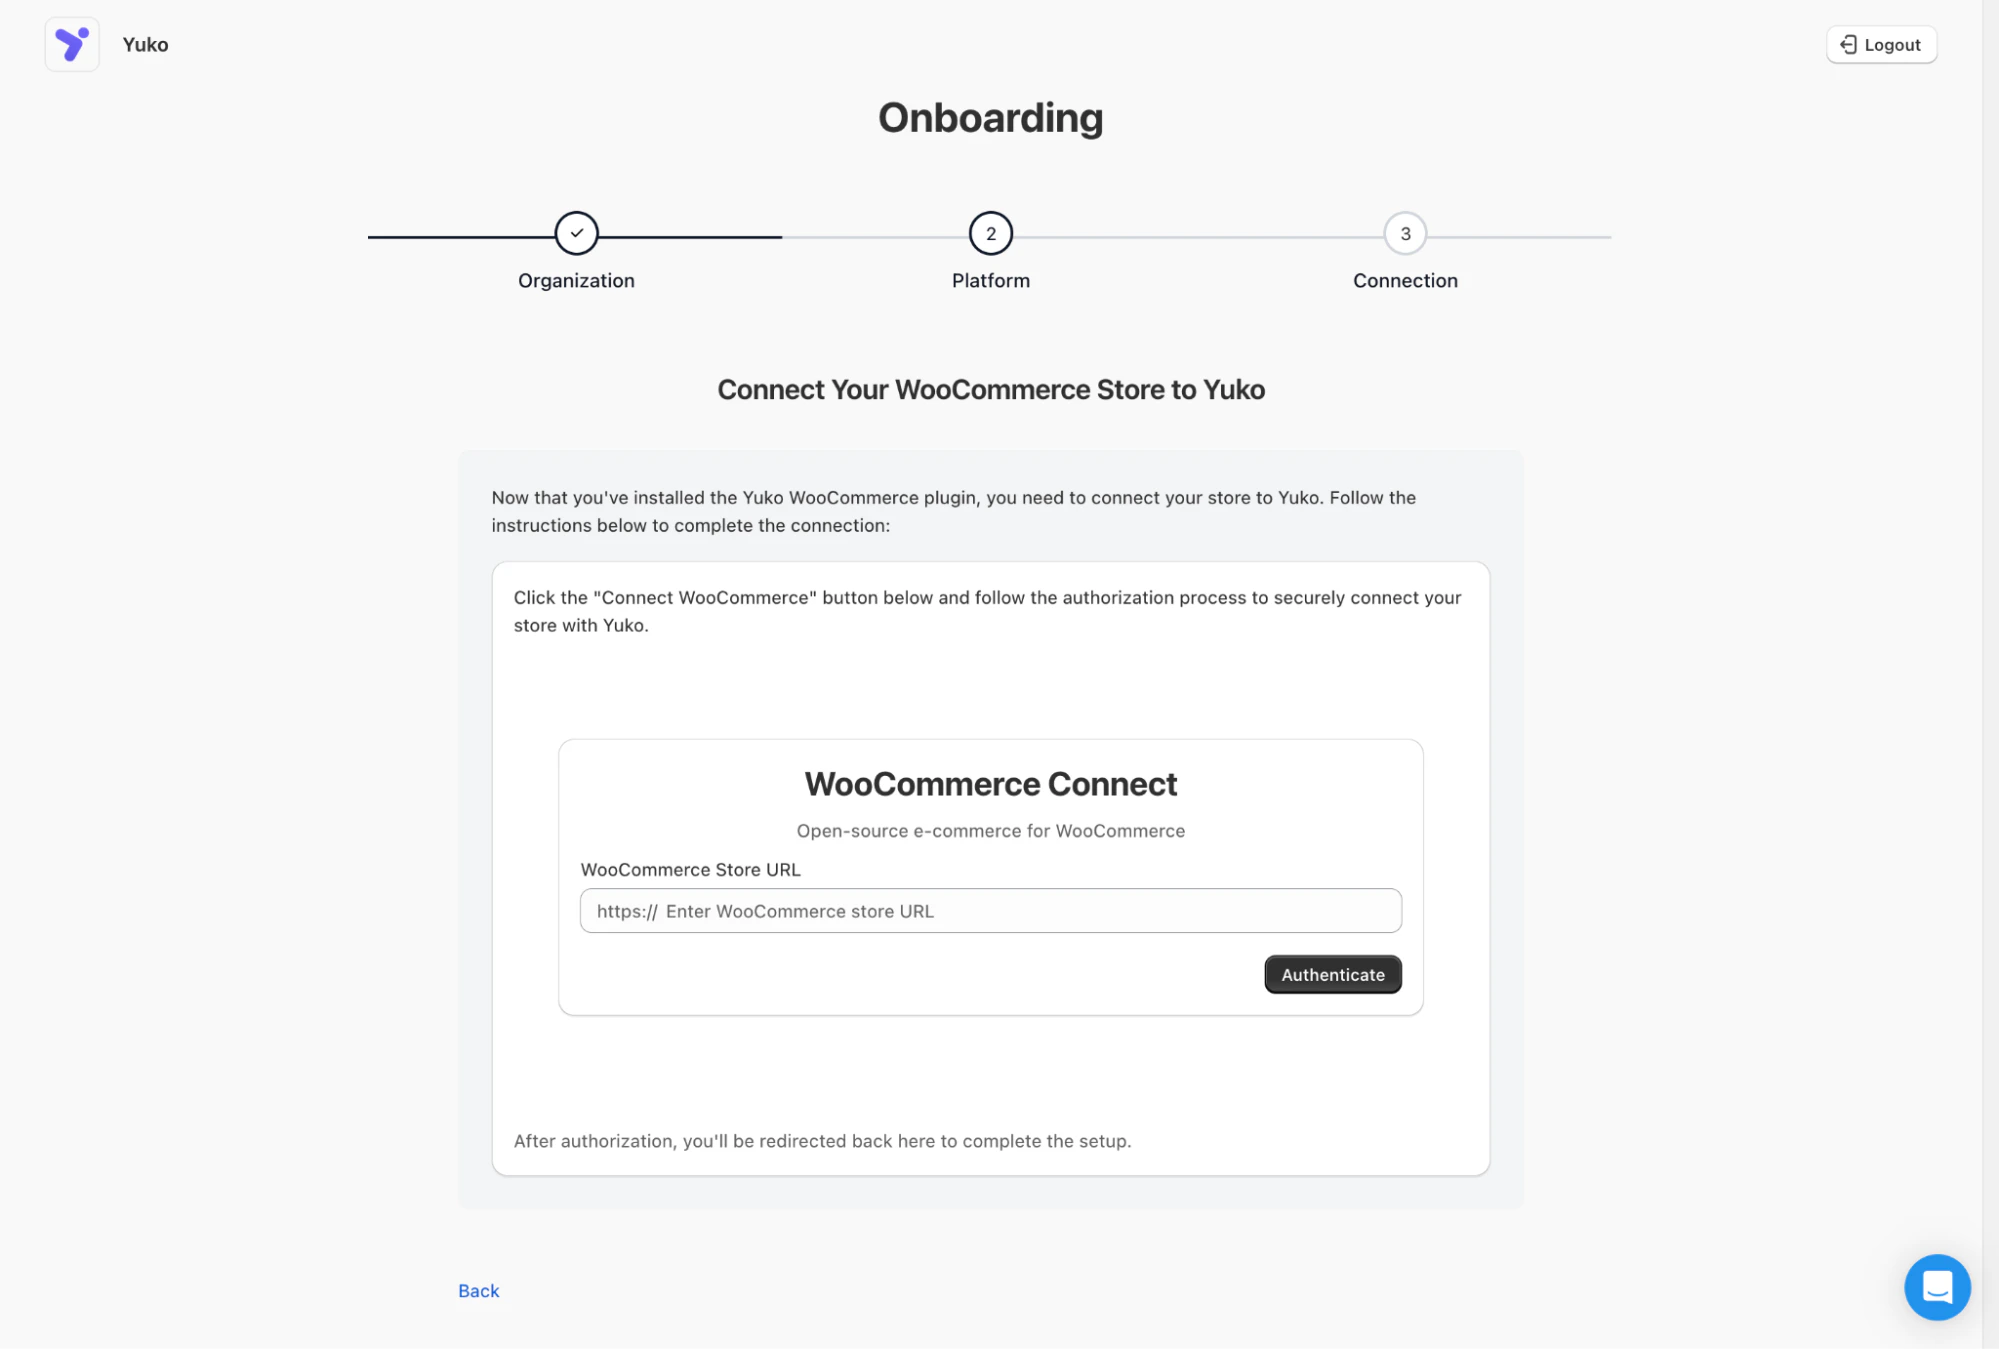 4. Wait for the connection to complete (shows "Connected" status)
 ### Sync Your Store Data
After connecting, manually sync your products and customers:
1. In **Yuko Dashboard**, stay in **Settings → Integrations**
2. Find the **WooCommerce** platform integration
3. Click the **Configure** button
4. Click **Sync Data** button to start importing:
* All products from your catalog
* Customer list (names and emails only)
* Existing WooCommerce reviews (if selected)
5. Wait for sync to complete
### Sync Your Store Data
After connecting, manually sync your products and customers:
1. In **Yuko Dashboard**, stay in **Settings → Integrations**
2. Find the **WooCommerce** platform integration
3. Click the **Configure** button
4. Click **Sync Data** button to start importing:
* All products from your catalog
* Customer list (names and emails only)
* Existing WooCommerce reviews (if selected)
5. Wait for sync to complete
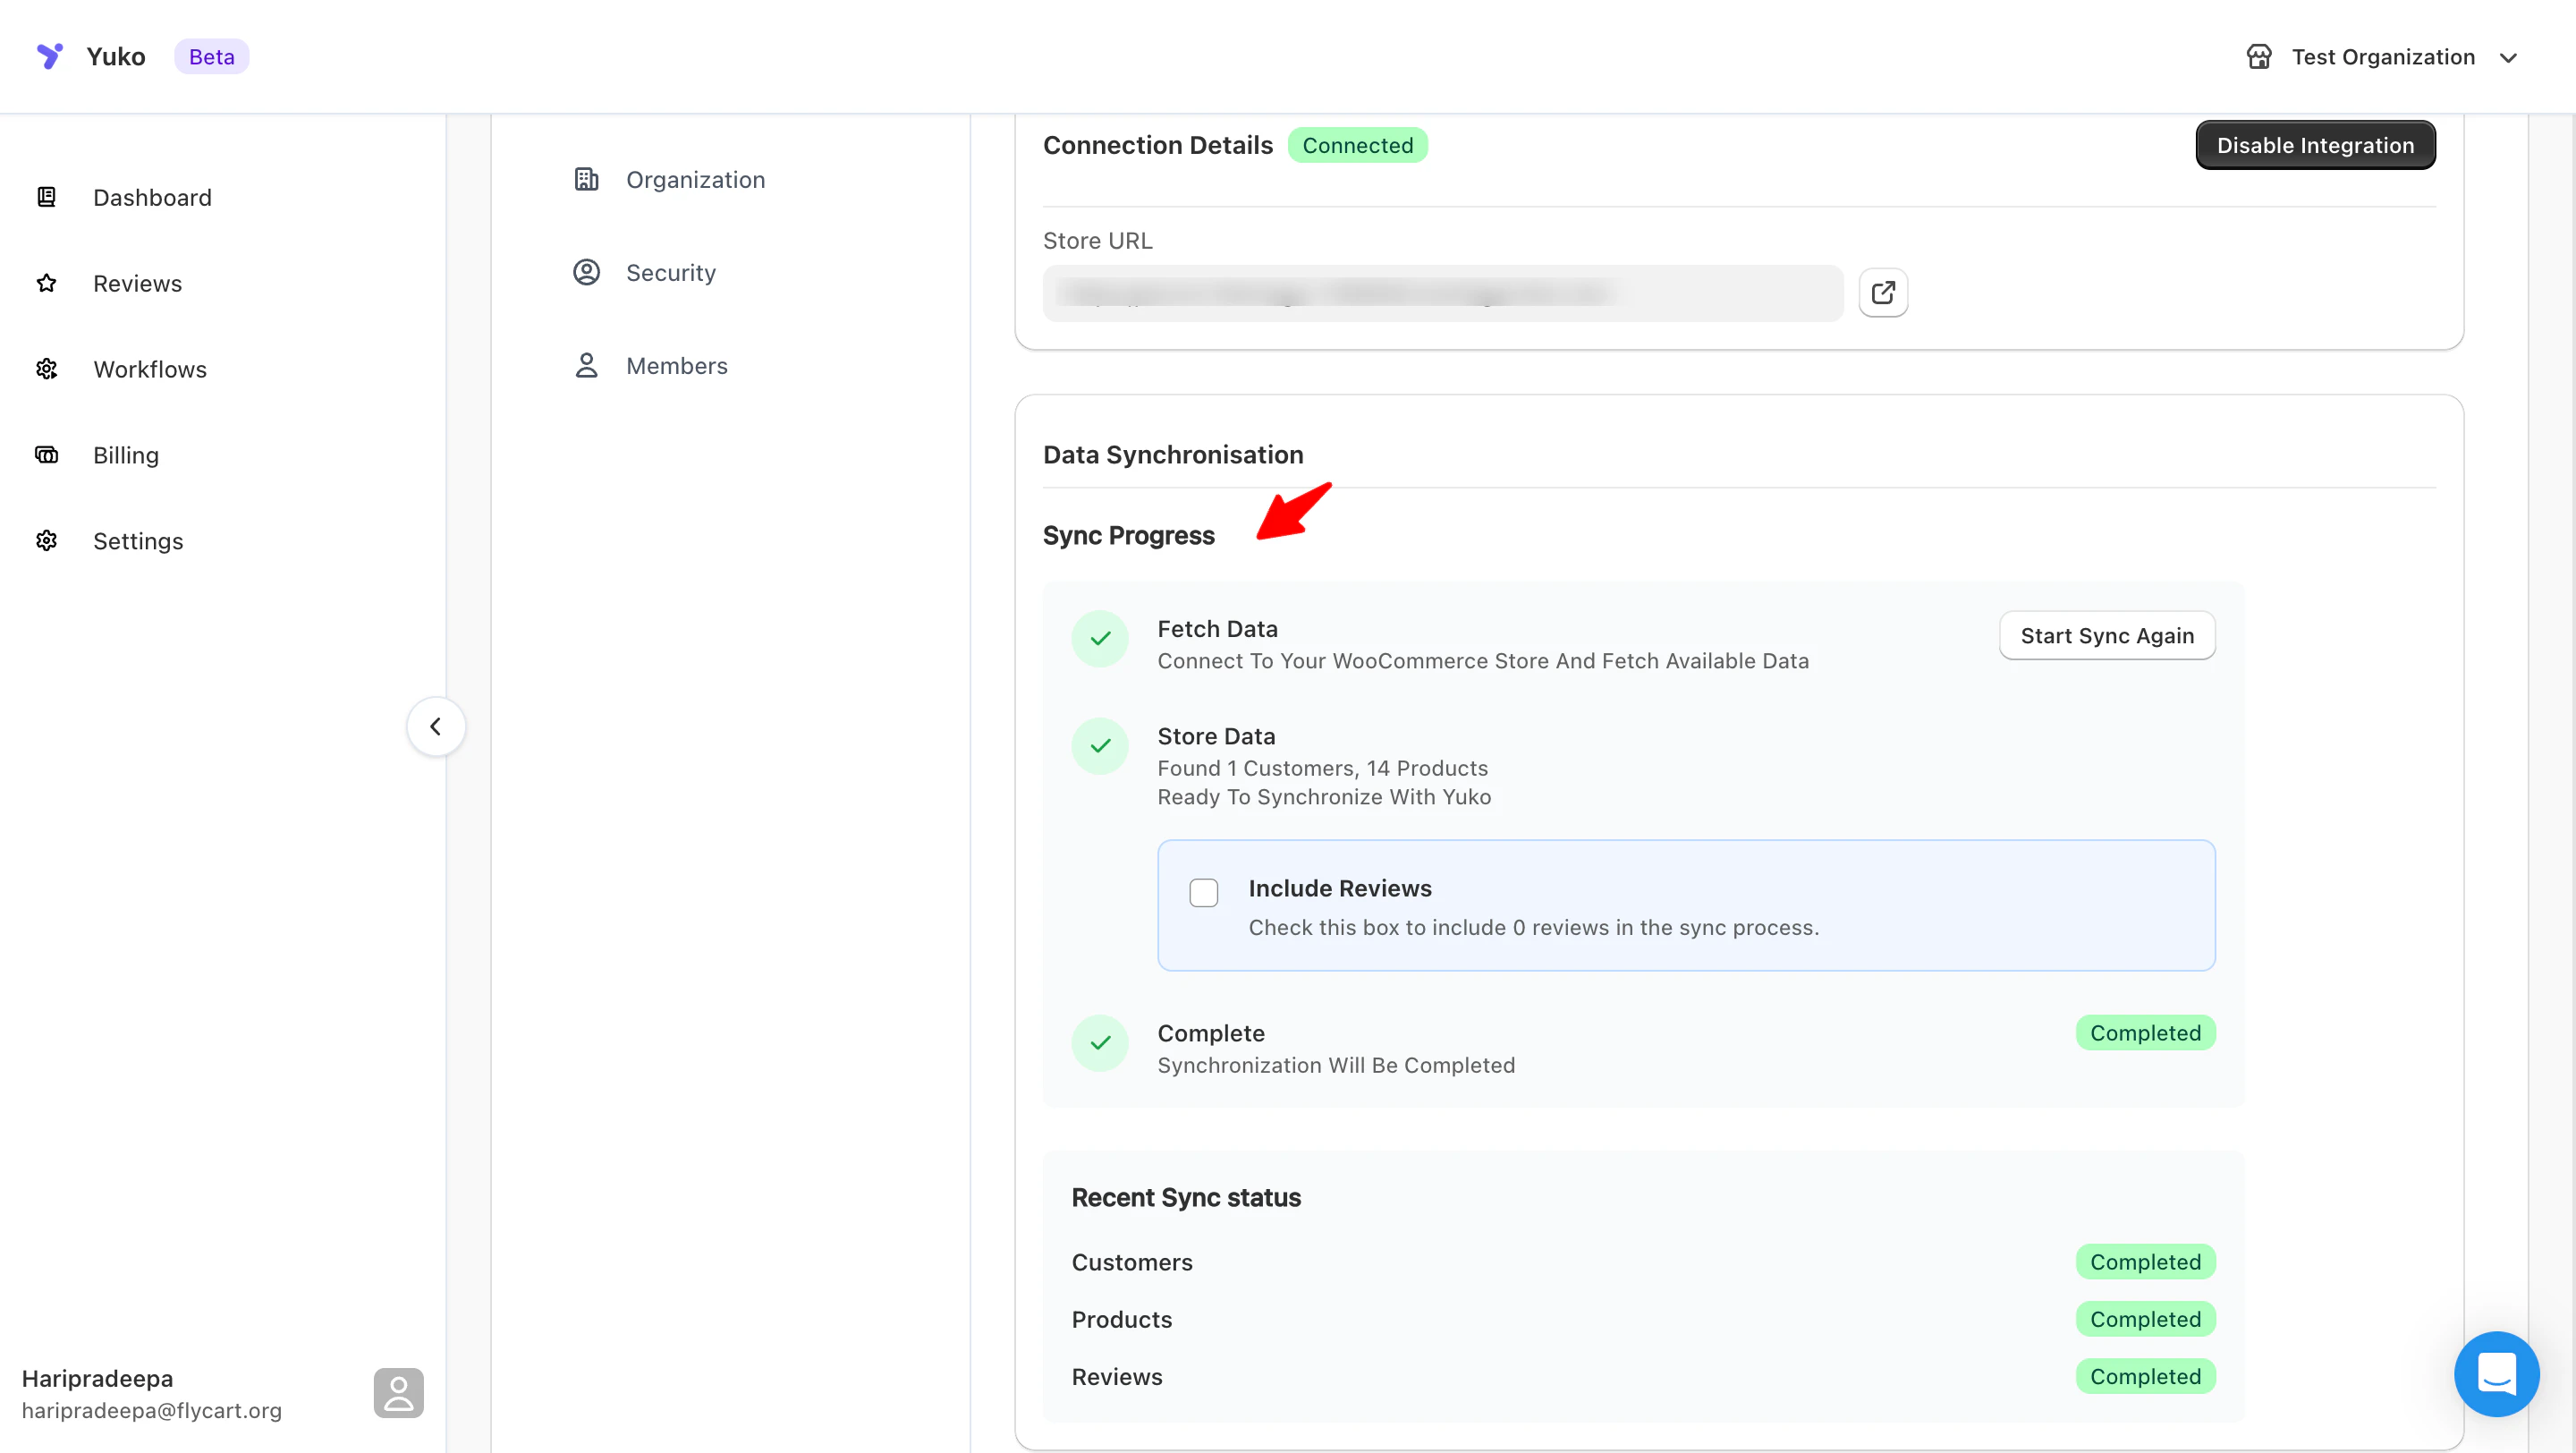 **Sync time:** 1-5 minutes depending on store size (small stores sync in 1 minute, large stores may take 5 minutes)
**Installation Complete!** Your WooCommerce store is now connected to Yuko and ready to collect reviews.
***
## Your Next Steps
Now that installation is complete, set up your review collection system:
Set up automatic emails that ask customers for reviews after their order is delivered.
**Time:** 10 minutes
→ [Set Up Review Requests](/collect-reviews/review-request-emails)
Show customer reviews on your product pages where shoppers make buying decisions.
**Time:** 5 minutes
→ [Product Page Reviews](/display-reviews/product-reviews-display-widget)
Decide if reviews appear immediately or need your approval first.
**Time:** 3 minutes
→ [Review Approval Settings](/managing-reviews/auto-publishing-reviews)
Add your logo and colors to make review emails match your store's brand.
**Time:** 5 minutes
→ [Brand Your Emails](/display-reviews/branding)
**Follow the quickstart:** For a complete setup guide with all essential steps, see the [Quickstart Guide](/quickstart)
***
## Advanced Installation Options
If the WordPress upload method doesn't work, use FTP to install manually:
**Requirements:**
* FTP client software (FileZilla, Cyberduck, etc.)
* FTP credentials from your hosting provider
**Steps:**
1. Download yuko.zip from Yuko Dashboard
2. **Unzip** the file on your computer (important!)
3. Connect to your site via FTP
4. Navigate to `/wp-content/plugins/`
5. Upload the entire unzipped `yuko` folder
6. Go to WordPress Admin → Plugins
7. Find "Yuko" and click "Activate"
**Time:** 10 minutes (if you know how to use FTP)
For WordPress Multisite installations:
**Network Activation:**
1. Install plugin normally
2. Go to Network Admin → Plugins
3. Click "Network Activate" under Yuko
**Per-Site Activation:**
1. Install plugin to network
2. Go to each site's Admin → Plugins
3. Activate Yuko individually on sites that need it
**Connection:** Each site needs separate connection to Yuko Dashboard (use different Store URLs for each site)
**Recommended for large stores:** Test on staging before production.
**Steps:**
1. Install Yuko on your staging site first
2. Test review collection and display
3. Verify everything works correctly
4. Then install on production site
5. Reconnect using production Store URL
**Note:** Each environment (staging, production) needs separate connection in Yuko Dashboard.
**Minimum server requirements:**
* PHP 7.4 or higher (PHP 8.0+ recommended)
* MySQL 5.6+ or MariaDB 10.0+
* HTTPS enabled (SSL certificate installed)
* WordPress memory limit: 128MB minimum (256MB recommended)
* Max execution time: 30 seconds minimum
**Tested hosting providers:**
* ✅ SiteGround
* ✅ WP Engine
* ✅ Kinsta
* ✅ Bluehost
* ✅ GoDaddy
* ✅ HostGator
**Check your server:** Go to WooCommerce → Status → System Status Report
***
## Common Installation Issues
**Possible causes:**
1. **Cache issue:**
* Clear your browser cache (Ctrl+Shift+Delete)
* Log out of WordPress and log back in
* Try a different browser
2. **User permissions:**
* Make sure you're logged in as Administrator
* Check User → Your Profile → Capabilities
3. **Plugin conflict:**
* Deactivate other plugins temporarily
* Check if Yuko appears
* Reactivate plugins one by one to find conflict
**Still not working?** [Contact support](https://yukoreviews.com/support) with:
* WordPress version
* WooCommerce version
* PHP version (from WooCommerce → Status)
* List of active plugins
**Checklist to fix connection issues:**
✓ **Store URL is correct:**
* Include https\:// (not http\://)
* Use your actual domain (not localhost)
* Don't include /wp-admin or other paths
* Example: `https://yourstore.com`
✓ **Plugin is activated:**
* Go to WordPress → Plugins
* Yuko should show "Active" status
✓ **WooCommerce is active:**
* Make sure WooCommerce plugin is working
* Test by visiting your store's shop page
✓ **No security blocking:**
* Temporarily disable security plugins
* Try connecting again
* Re-enable security plugins after successful connection
✓ **Firewall not blocking:**
* Some hosting providers block external API calls
* Contact your hosting support
* Ask them to whitelist Yuko API (app.yukoapp.com)
**If products aren't appearing in Yuko:**
1. **Check product status in WooCommerce:**
* Products must be "Published" (not Draft or Private)
* Products must be visible in catalog
2. **Wait for sync:**
* Initial sync takes 1-5 minutes for small stores
* Large stores (1000+ products) may take 15 minutes
3. **Force manual sync:**
* Go to Yuko Dashboard → Settings → Integrations
* Click "Sync Now" button
* Wait 2-3 minutes
**If orders aren't appearing:**
* Yuko only syncs "Completed" orders by default
* Check that orders are marked "Completed" in WooCommerce
* Pending, Processing, or Draft orders won't trigger review emails unless you map them in the workflow
**If clicking verification link shows error:**
1. **Link expired:**
* Links expire after 24 hours
* Go to Yuko login page
* Click "Resend verification email"
2. **Link was already used:**
* Try logging in directly
* Your account may already be verified
3. **Email client broke the link:**
* Some email apps break long URLs
* Copy the entire link manually
* Paste into browser address bar
**Still can't verify?**
* [Contact support](https://yukoreviews.com/support) from the email address you used
* We'll verify your account manually (within 24 hours)
***
## Need Help?
Talk to our team for personalized setup help
**Time:** 30 minutes
Reach our team at yukoreviews.com/support
**Response time:** Within 24 hours
Browse detailed guides for every feature
Connect Yuko with other tools
**Pro tip:** After installation, immediately set up review request emails so you don't miss any orders. Go to [Review Request Setup](/collect-reviews/review-request-emails) next.
**Sync time:** 1-5 minutes depending on store size (small stores sync in 1 minute, large stores may take 5 minutes)
**Installation Complete!** Your WooCommerce store is now connected to Yuko and ready to collect reviews.
***
## Your Next Steps
Now that installation is complete, set up your review collection system:
Set up automatic emails that ask customers for reviews after their order is delivered.
**Time:** 10 minutes
→ [Set Up Review Requests](/collect-reviews/review-request-emails)
Show customer reviews on your product pages where shoppers make buying decisions.
**Time:** 5 minutes
→ [Product Page Reviews](/display-reviews/product-reviews-display-widget)
Decide if reviews appear immediately or need your approval first.
**Time:** 3 minutes
→ [Review Approval Settings](/managing-reviews/auto-publishing-reviews)
Add your logo and colors to make review emails match your store's brand.
**Time:** 5 minutes
→ [Brand Your Emails](/display-reviews/branding)
**Follow the quickstart:** For a complete setup guide with all essential steps, see the [Quickstart Guide](/quickstart)
***
## Advanced Installation Options
If the WordPress upload method doesn't work, use FTP to install manually:
**Requirements:**
* FTP client software (FileZilla, Cyberduck, etc.)
* FTP credentials from your hosting provider
**Steps:**
1. Download yuko.zip from Yuko Dashboard
2. **Unzip** the file on your computer (important!)
3. Connect to your site via FTP
4. Navigate to `/wp-content/plugins/`
5. Upload the entire unzipped `yuko` folder
6. Go to WordPress Admin → Plugins
7. Find "Yuko" and click "Activate"
**Time:** 10 minutes (if you know how to use FTP)
For WordPress Multisite installations:
**Network Activation:**
1. Install plugin normally
2. Go to Network Admin → Plugins
3. Click "Network Activate" under Yuko
**Per-Site Activation:**
1. Install plugin to network
2. Go to each site's Admin → Plugins
3. Activate Yuko individually on sites that need it
**Connection:** Each site needs separate connection to Yuko Dashboard (use different Store URLs for each site)
**Recommended for large stores:** Test on staging before production.
**Steps:**
1. Install Yuko on your staging site first
2. Test review collection and display
3. Verify everything works correctly
4. Then install on production site
5. Reconnect using production Store URL
**Note:** Each environment (staging, production) needs separate connection in Yuko Dashboard.
**Minimum server requirements:**
* PHP 7.4 or higher (PHP 8.0+ recommended)
* MySQL 5.6+ or MariaDB 10.0+
* HTTPS enabled (SSL certificate installed)
* WordPress memory limit: 128MB minimum (256MB recommended)
* Max execution time: 30 seconds minimum
**Tested hosting providers:**
* ✅ SiteGround
* ✅ WP Engine
* ✅ Kinsta
* ✅ Bluehost
* ✅ GoDaddy
* ✅ HostGator
**Check your server:** Go to WooCommerce → Status → System Status Report
***
## Common Installation Issues
**Possible causes:**
1. **Cache issue:**
* Clear your browser cache (Ctrl+Shift+Delete)
* Log out of WordPress and log back in
* Try a different browser
2. **User permissions:**
* Make sure you're logged in as Administrator
* Check User → Your Profile → Capabilities
3. **Plugin conflict:**
* Deactivate other plugins temporarily
* Check if Yuko appears
* Reactivate plugins one by one to find conflict
**Still not working?** [Contact support](https://yukoreviews.com/support) with:
* WordPress version
* WooCommerce version
* PHP version (from WooCommerce → Status)
* List of active plugins
**Checklist to fix connection issues:**
✓ **Store URL is correct:**
* Include https\:// (not http\://)
* Use your actual domain (not localhost)
* Don't include /wp-admin or other paths
* Example: `https://yourstore.com`
✓ **Plugin is activated:**
* Go to WordPress → Plugins
* Yuko should show "Active" status
✓ **WooCommerce is active:**
* Make sure WooCommerce plugin is working
* Test by visiting your store's shop page
✓ **No security blocking:**
* Temporarily disable security plugins
* Try connecting again
* Re-enable security plugins after successful connection
✓ **Firewall not blocking:**
* Some hosting providers block external API calls
* Contact your hosting support
* Ask them to whitelist Yuko API (app.yukoapp.com)
**If products aren't appearing in Yuko:**
1. **Check product status in WooCommerce:**
* Products must be "Published" (not Draft or Private)
* Products must be visible in catalog
2. **Wait for sync:**
* Initial sync takes 1-5 minutes for small stores
* Large stores (1000+ products) may take 15 minutes
3. **Force manual sync:**
* Go to Yuko Dashboard → Settings → Integrations
* Click "Sync Now" button
* Wait 2-3 minutes
**If orders aren't appearing:**
* Yuko only syncs "Completed" orders by default
* Check that orders are marked "Completed" in WooCommerce
* Pending, Processing, or Draft orders won't trigger review emails unless you map them in the workflow
**If clicking verification link shows error:**
1. **Link expired:**
* Links expire after 24 hours
* Go to Yuko login page
* Click "Resend verification email"
2. **Link was already used:**
* Try logging in directly
* Your account may already be verified
3. **Email client broke the link:**
* Some email apps break long URLs
* Copy the entire link manually
* Paste into browser address bar
**Still can't verify?**
* [Contact support](https://yukoreviews.com/support) from the email address you used
* We'll verify your account manually (within 24 hours)
***
## Need Help?
Talk to our team for personalized setup help
**Time:** 30 minutes
Reach our team at yukoreviews.com/support
**Response time:** Within 24 hours
Browse detailed guides for every feature
Connect Yuko with other tools
**Pro tip:** After installation, immediately set up review request emails so you don't miss any orders. Go to [Review Request Setup](/collect-reviews/review-request-emails) next.