> ## Documentation Index
> Fetch the complete documentation index at: https://docs.yukoreviews.com/llms.txt
> Use this file to discover all available pages before exploring further.
> Add review collection forms to your product pages so customers can leave feedback directly on your site
# Review Collection Form Setup
## Let Customers Review Directly on Your Store
The review collection form is where customers write reviews on your website. While most reviews come from email requests (5-10% response rate), on-site forms capture 1-2% of visitors who want to leave feedback without being asked. Every review counts.
**What you'll achieve:**
* Add "Write a Review" buttons to product pages
* Collect reviews from customers browsing your store
* Customize form appearance to match your brand
* Make reviewing easy and mobile-friendly
* Capture organic reviews from happy customers
**Impact:** Organic reviews from on-site forms are often more detailed and authentic than email-prompted reviews
***
## How the Review Form Works
Navigation: Yuko Dashboard → **Reviews → Widgets → Review Collection Form**
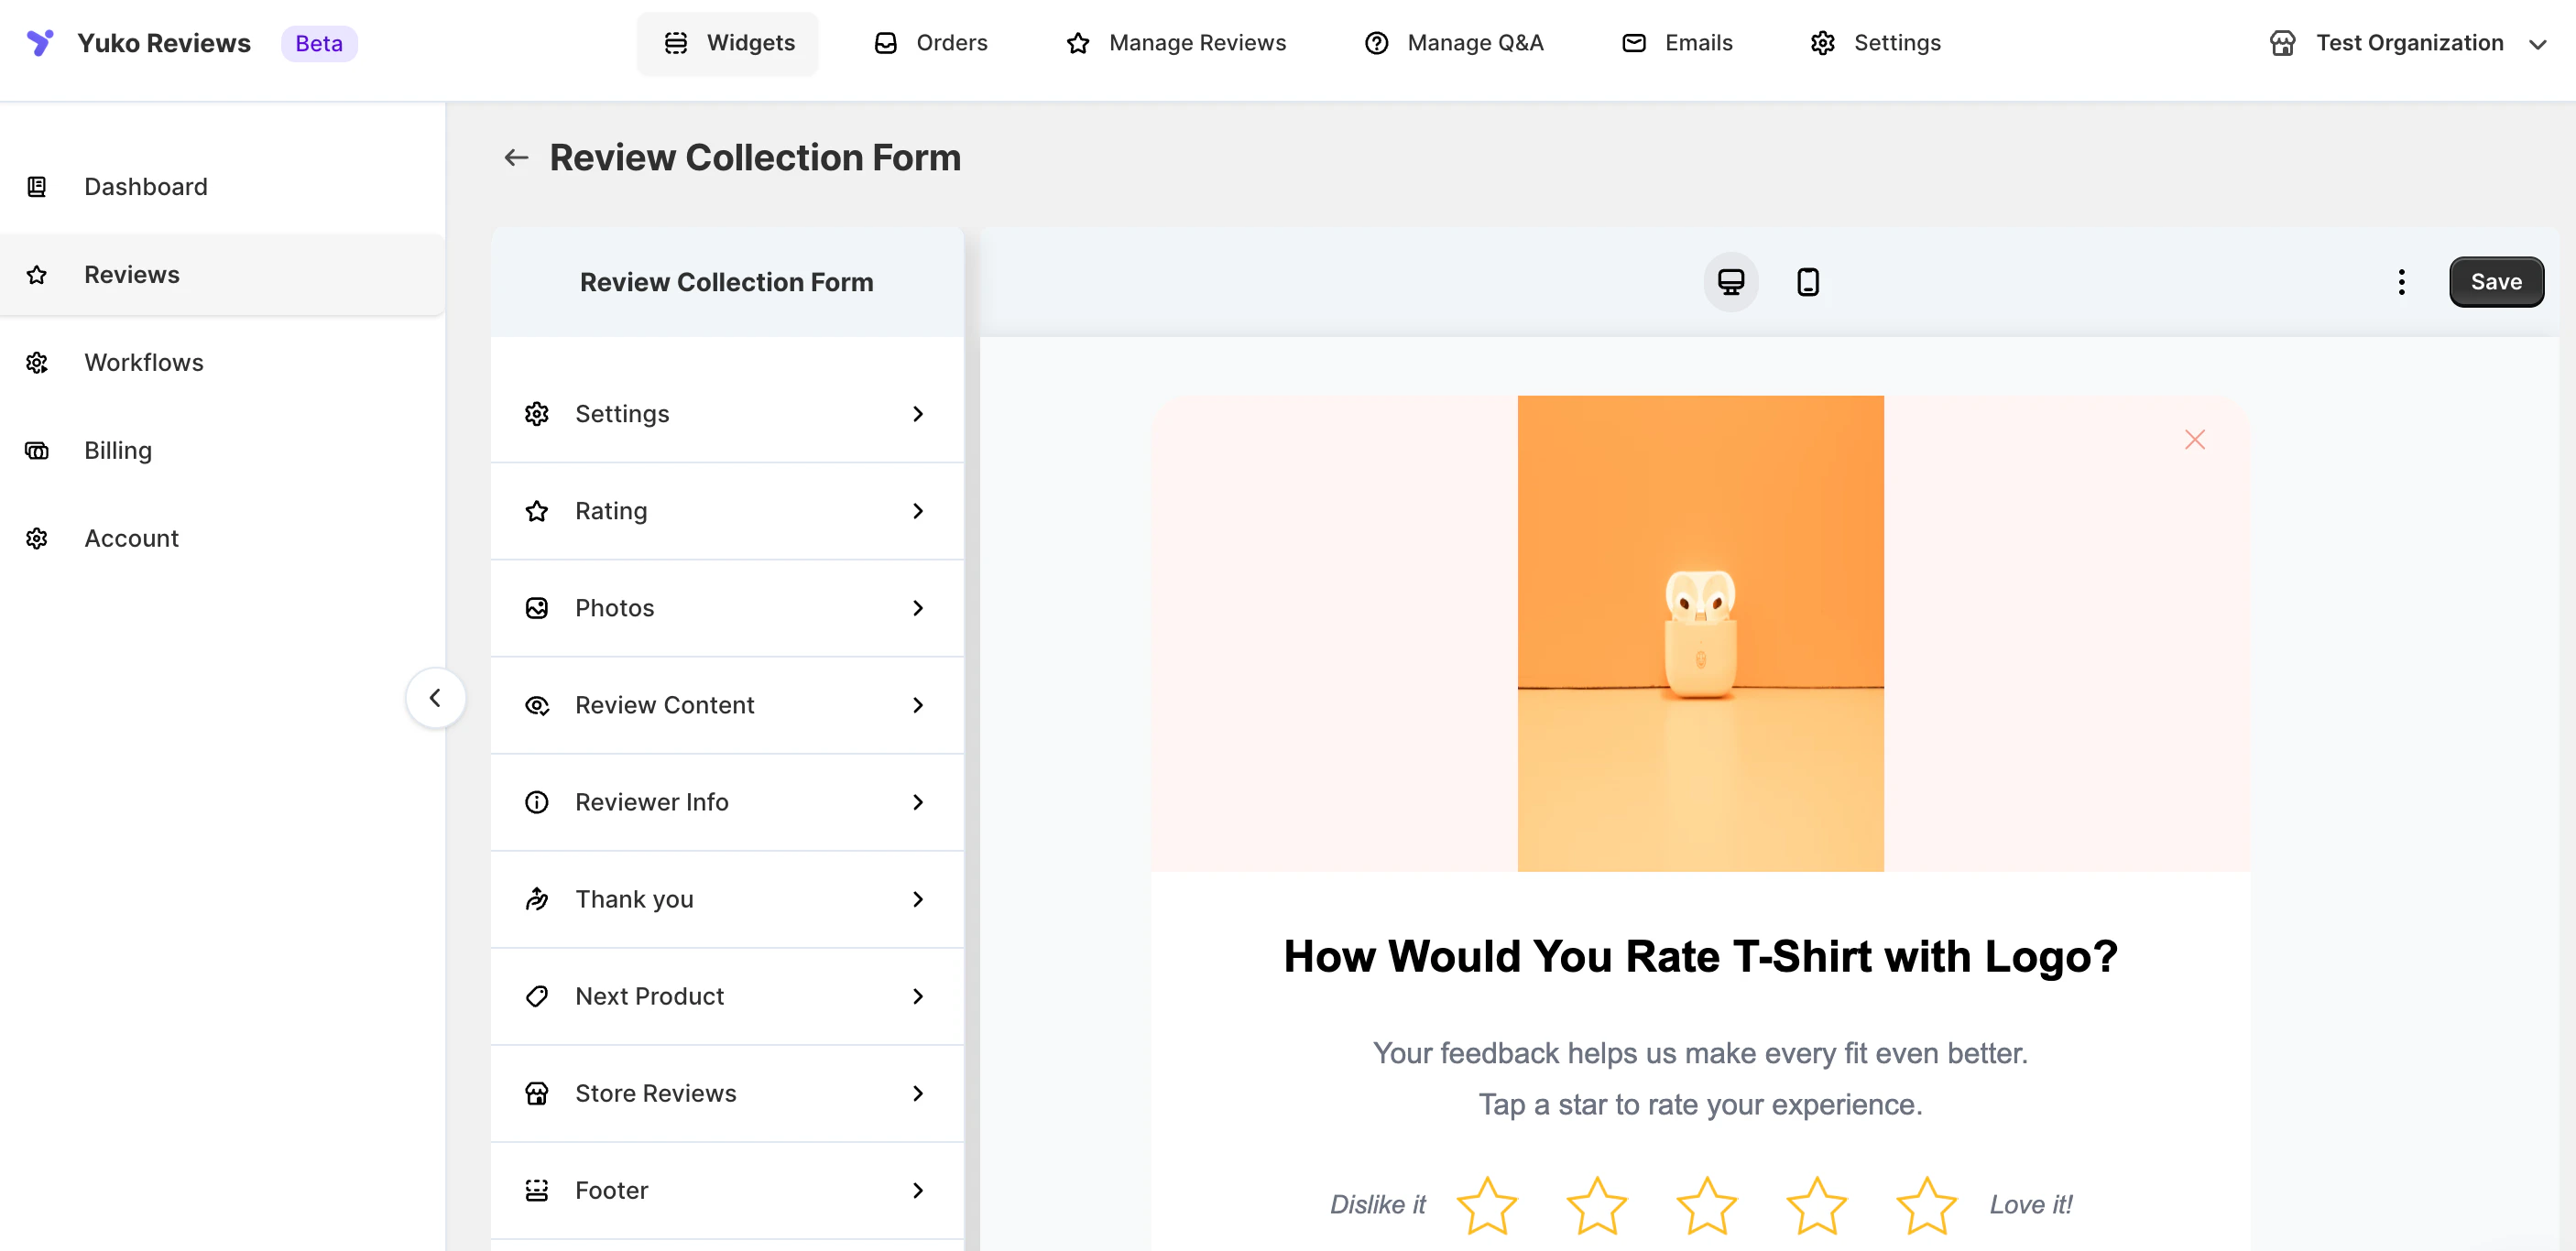 ### Customer Journey
The Review Collection Form allows customers to leave feedback directly on your store. Here’s how it works step by step:
Customer is on a product page and clicks "Write a Review" button.
**Where they see it:**
* Below product description
* In reviews section
* After purchase confirmation
* On "My Orders" page
Form modal or page opens with customized fields.
**What they see:**
* Star rating selector (1-5 stars)
* Review title field (optional)
* Review text area
* Photo upload option
* Name and email fields
Customer fills in rating, writes review, optionally adds photos.
**Typical completion time:** 2-3 minutes for text review, 4-5 minutes with photos
Review is submitted and enters your moderation queue or publishes immediately.
**What happens:**
* Thank you message displays
* Review awaits approval (if manual moderation)
* Or appears on site instantly (if auto-publish enabled)
If customer ordered multiple products, they're prompted to review others.
**Smart prompts:** Only shows products they actually purchased
***
## Form Customization Options
Make the form match your brand and optimize for conversions:
* Background color, border radius, shadows
* Button styles and colors
* Input field design
* Typography (font family, sizes)
* Spacing and padding
**Brand Consistency:**
* Use your brand colors
* Match site button styles
* Consistent fonts
* Add your logo in the header
**Best Practices:**
* Keep the form clean and minimal
* Ensure high contrast for readability
* Mobile-friendly sizing
* Clear call-to-action buttons
* Pro tip: Match your form to your checkout design
**Pro tip:** Match your form to your checkout design - customers already trust that visual style.
**Customize the star rating experience:**
* **Rating Question:** Default: “How would you rate this product?”
* Examples: “What did you think?”, “Rate your experience”, “Overall satisfaction?”
* **Rating Labels:**
* 1 star (min): “Poor”, “Not great”, “Disappointed”
* 5 stars (max): “Excellent”, “Amazing”, “Love it!”
* Mid-range: “It’s okay”, “Good”, “Great”
* **Additional Options:**
* Short description under the question
* Required vs optional (always make required)
* Half-star ratings not recommended
**Best Practices:**
* Keep the question simple and clear
* Use positive language for max rating
* Avoid negative language for min rating
**Never ask leading questions:** Don't say "How much do you LOVE this product?" - it creates bias toward positive reviews.
import NeedHelp from '/snippets/need-help.mdx';
* **Button Customization:**
* Text: “Add photos”, “Upload images”, “Show us!”
* Icon and color, placement above or below text
* **Upload Prompts:**
* “Show your new look!”
* “Share how it turned out!”
* “Let others see it in real life”
* “Upload unboxing photos”
* **Technical Settings:**
* Max photos per review: 5 recommended
* Video support (optional), max length 30 sec
* File size limits, accepted formats: JPG, PNG, HEIC, MP4
**Best Practices:**
* Make uploads optional
* Show example submissions
* Enable one-tap upload on mobile
* Clear guidance for file size/format
* Compress large files automatically
**Incentive Messaging:**
* Example: “Get 10% off for photo reviews!”
* Display above upload button
***
* **Review Title Field:**
* Label examples: “Review Title”, “Headline”, “Summary”
* Placeholder: “Summarize your experience…”
* Optional, character limit: 50–100
* **Review Text Area:**
* Label: “Your Review”, “Tell us more”
* Placeholder: “What did you like? How did it fit? Would you recommend it?”
* Optional but encouraged
* Min 20 characters, max 500–1000
* **Guidance Text Examples:**
* “Share details about quality, fit, and value”
* “Help other shoppers make confident decisions”
* “What should others know about this product?”
**Best Practices:**
* Keep labels short and clear
* Use helpful placeholder text
* Suggest topics to cover
* Show live character count
**Finding the balance:** Optional review text gets more submissions but shorter reviews. Required text (minimum 20 characters) gets 30% fewer submissions but much better quality.
* **Name Field:**
* Label: “Your Name”, “Display Name”
* Required for credibility
* Option to display publicly
* **Email Field:**
* Label: “Email”, “Email Address”
* Required for verification
* Never displayed publicly, used for verified purchase badge
**Additional Optional Fields:**
* Location (city/country)
* Age range
* Product usage
* Purchase occasion
**Privacy Note:**
* Add disclaimer: “Your email will never be shared”
* Link to privacy policy, GDPR compliance if needed
**Best Practices:**
* Only ask for name and email minimum
* Explain why email is needed
* Make additional fields optional
* Highlight verified purchase badge
**Celebrate the submission:**
**Customization options:**
* Message text
* Emoji and styling
* Incentive announcement
* Next steps
**Effective thank you messages:**
* "Thanks for reviewing! You just made our day 💛"
* "Amazing! Your review helps other shoppers. Check your email for a thank-you discount!"
* "Review submitted! We'll send you a reward code within 24 hours."
* "Thank you! Your feedback makes us better."
**What to include:**
* Genuine thanks
* What happens next (approval process)
* Reward details if applicable
* Invitation to review other products
**Best practices:**
* Be warm and personal
* Mention any rewards
* Set expectations (approval time)
* Encourage sharing on social
* Link to their order history
**Pro tip:** Include a "Share on social" option in the thank you message - customers who just reviewed are in a positive mindset and may share their purchase.
**For developers and power users:**
**Custom CSS:**
* Override any default styles
* Match exact brand guidelines
* Custom animations
* Responsive breakpoints
**Custom JavaScript:**
* Form validation logic
* Analytics tracking
* A/B testing variants
* Dynamic field showing/hiding
**API integration:**
* Send reviews to other platforms
* Sync with CRM
* Trigger automations
* Custom notifications
**Best practices:**
* Test changes on staging first
* Ensure mobile compatibility
* Don't break accessibility
* Monitor form completion rates
***
## Next Steps
Match the review form to your brand colors and style.
**Time:** 15 minutes **Location:** Reviews → Widgets → Review Collection Form → Design
Embed the "Write a Review" button on all product pages.
**Time:** 10 minutes (varies by platform) **Implementation:** Add widget code to product template
Verify the form works perfectly on actual mobile devices.
**Time:** 10 minutes **Test:** Photo upload, form submission, thank you page
Combine on-site forms with automated email requests for maximum reviews.
**Time:** 10 minutes → [Review Request Email Setup](/collect-reviews/review-request-emails)
***
## Need Help?
**Pro tip:** The on-site form is important, but email review requests drive 80% of reviews. Set up both, but prioritize getting review request emails working first.
### Customer Journey
The Review Collection Form allows customers to leave feedback directly on your store. Here’s how it works step by step:
Customer is on a product page and clicks "Write a Review" button.
**Where they see it:**
* Below product description
* In reviews section
* After purchase confirmation
* On "My Orders" page
Form modal or page opens with customized fields.
**What they see:**
* Star rating selector (1-5 stars)
* Review title field (optional)
* Review text area
* Photo upload option
* Name and email fields
Customer fills in rating, writes review, optionally adds photos.
**Typical completion time:** 2-3 minutes for text review, 4-5 minutes with photos
Review is submitted and enters your moderation queue or publishes immediately.
**What happens:**
* Thank you message displays
* Review awaits approval (if manual moderation)
* Or appears on site instantly (if auto-publish enabled)
If customer ordered multiple products, they're prompted to review others.
**Smart prompts:** Only shows products they actually purchased
***
## Form Customization Options
Make the form match your brand and optimize for conversions:
* Background color, border radius, shadows
* Button styles and colors
* Input field design
* Typography (font family, sizes)
* Spacing and padding
**Brand Consistency:**
* Use your brand colors
* Match site button styles
* Consistent fonts
* Add your logo in the header
**Best Practices:**
* Keep the form clean and minimal
* Ensure high contrast for readability
* Mobile-friendly sizing
* Clear call-to-action buttons
* Pro tip: Match your form to your checkout design
**Pro tip:** Match your form to your checkout design - customers already trust that visual style.
**Customize the star rating experience:**
* **Rating Question:** Default: “How would you rate this product?”
* Examples: “What did you think?”, “Rate your experience”, “Overall satisfaction?”
* **Rating Labels:**
* 1 star (min): “Poor”, “Not great”, “Disappointed”
* 5 stars (max): “Excellent”, “Amazing”, “Love it!”
* Mid-range: “It’s okay”, “Good”, “Great”
* **Additional Options:**
* Short description under the question
* Required vs optional (always make required)
* Half-star ratings not recommended
**Best Practices:**
* Keep the question simple and clear
* Use positive language for max rating
* Avoid negative language for min rating
**Never ask leading questions:** Don't say "How much do you LOVE this product?" - it creates bias toward positive reviews.
import NeedHelp from '/snippets/need-help.mdx';
* **Button Customization:**
* Text: “Add photos”, “Upload images”, “Show us!”
* Icon and color, placement above or below text
* **Upload Prompts:**
* “Show your new look!”
* “Share how it turned out!”
* “Let others see it in real life”
* “Upload unboxing photos”
* **Technical Settings:**
* Max photos per review: 5 recommended
* Video support (optional), max length 30 sec
* File size limits, accepted formats: JPG, PNG, HEIC, MP4
**Best Practices:**
* Make uploads optional
* Show example submissions
* Enable one-tap upload on mobile
* Clear guidance for file size/format
* Compress large files automatically
**Incentive Messaging:**
* Example: “Get 10% off for photo reviews!”
* Display above upload button
***
* **Review Title Field:**
* Label examples: “Review Title”, “Headline”, “Summary”
* Placeholder: “Summarize your experience…”
* Optional, character limit: 50–100
* **Review Text Area:**
* Label: “Your Review”, “Tell us more”
* Placeholder: “What did you like? How did it fit? Would you recommend it?”
* Optional but encouraged
* Min 20 characters, max 500–1000
* **Guidance Text Examples:**
* “Share details about quality, fit, and value”
* “Help other shoppers make confident decisions”
* “What should others know about this product?”
**Best Practices:**
* Keep labels short and clear
* Use helpful placeholder text
* Suggest topics to cover
* Show live character count
**Finding the balance:** Optional review text gets more submissions but shorter reviews. Required text (minimum 20 characters) gets 30% fewer submissions but much better quality.
* **Name Field:**
* Label: “Your Name”, “Display Name”
* Required for credibility
* Option to display publicly
* **Email Field:**
* Label: “Email”, “Email Address”
* Required for verification
* Never displayed publicly, used for verified purchase badge
**Additional Optional Fields:**
* Location (city/country)
* Age range
* Product usage
* Purchase occasion
**Privacy Note:**
* Add disclaimer: “Your email will never be shared”
* Link to privacy policy, GDPR compliance if needed
**Best Practices:**
* Only ask for name and email minimum
* Explain why email is needed
* Make additional fields optional
* Highlight verified purchase badge
**Celebrate the submission:**
**Customization options:**
* Message text
* Emoji and styling
* Incentive announcement
* Next steps
**Effective thank you messages:**
* "Thanks for reviewing! You just made our day 💛"
* "Amazing! Your review helps other shoppers. Check your email for a thank-you discount!"
* "Review submitted! We'll send you a reward code within 24 hours."
* "Thank you! Your feedback makes us better."
**What to include:**
* Genuine thanks
* What happens next (approval process)
* Reward details if applicable
* Invitation to review other products
**Best practices:**
* Be warm and personal
* Mention any rewards
* Set expectations (approval time)
* Encourage sharing on social
* Link to their order history
**Pro tip:** Include a "Share on social" option in the thank you message - customers who just reviewed are in a positive mindset and may share their purchase.
**For developers and power users:**
**Custom CSS:**
* Override any default styles
* Match exact brand guidelines
* Custom animations
* Responsive breakpoints
**Custom JavaScript:**
* Form validation logic
* Analytics tracking
* A/B testing variants
* Dynamic field showing/hiding
**API integration:**
* Send reviews to other platforms
* Sync with CRM
* Trigger automations
* Custom notifications
**Best practices:**
* Test changes on staging first
* Ensure mobile compatibility
* Don't break accessibility
* Monitor form completion rates
***
## Next Steps
Match the review form to your brand colors and style.
**Time:** 15 minutes **Location:** Reviews → Widgets → Review Collection Form → Design
Embed the "Write a Review" button on all product pages.
**Time:** 10 minutes (varies by platform) **Implementation:** Add widget code to product template
Verify the form works perfectly on actual mobile devices.
**Time:** 10 minutes **Test:** Photo upload, form submission, thank you page
Combine on-site forms with automated email requests for maximum reviews.
**Time:** 10 minutes → [Review Request Email Setup](/collect-reviews/review-request-emails)
***
## Need Help?
**Pro tip:** The on-site form is important, but email review requests drive 80% of reviews. Set up both, but prioritize getting review request emails working first.